Introduction
Think about how most things are made. You start with a block of material—metal, plastic, wood—and cut away everything that doesn't belong. Carve, mill, drill, shape. That's subtractive manufacturing. It's how we've made things for centuries.
Now imagine the opposite. Instead of cutting away, you add material exactly where you want it. A tiny bit here, another layer there, building up until the object exists. No waste. No limits from tool access. Just pure creation.
That's additive manufacturing. That's 3D printing.
And it works layer by layer.
Every printed object starts as a digital model. Software slices that model into hundreds or thousands of thin horizontal layers. Then the printer deposits material—plastic, resin, powder, metal—following the shape of each layer until the final object emerges.
This layer-by-layer process is what makes 3D printing fundamentally different. It's also what makes it powerful. Understanding how it works helps you design better parts, choose the right technology, and get the results you expect.
Let's walk through the entire process, from digital idea to finished object.
How Does a Digital Model Become Printable?
Step 1: Creating the 3D Model
Every print starts with a digital blueprint. There are two ways to get one.
CAD software builds models from scratch. Designers start with basic shapes—cubes, spheres, cylinders—and combine, modify, and refine them into complex forms. A custom jewelry pendant might begin as a simple heart shape, then gain intricate filigree details through careful modeling.
Popular CAD tools include:
- SolidWorks for mechanical design
- Fusion 360 for product development
- Blender for organic shapes and artistic work
- Tinkercad for beginners
3D scanning captures existing objects. A scanner projects light onto an object, measures reflections, and creates a point cloud. Software converts that point cloud into a watertight 3D model. Archaeologists use this to digitize fragile artifacts. Engineers use it to reverse-engineer parts that are no longer available.
Step 2: Slicing the Model
The 3D model alone won't print. It needs to be sliced into layers.
Slicing software—Cura, PrusaSlicer, Simplify3D—takes the model and divides it into hundreds of horizontal cross-sections. Each layer becomes a set of instructions: move here, deposit material, move there.
Critical decisions happen during slicing:
Layer thickness dramatically affects quality and time. A 0.1mm layer produces smooth surfaces but takes twice as long as 0.2mm. For functional parts where appearance matters less, thicker layers save time. For detailed models where every micron counts, thin layers are worth the wait.
Infill controls internal structure. 100% infill makes solid, heavy parts. 20% infill with a honeycomb pattern saves material while maintaining strength. The right choice depends on how the part will be used.
Support structures hold up overhanging features. The software identifies areas that would otherwise collapse and adds temporary scaffolding. After printing, these supports must be removed.
Print speed balances time against quality. Faster printing risks layer adhesion issues. Slower printing produces better results but takes longer.
How Do Different Technologies Build Layers?
Not all layer-by-layer printing works the same way. The technology you choose determines what materials you can use and what results to expect.
Material Extrusion (FDM)
Fused Deposition Modeling is the most common 3D printing technology. It works like a high-precision hot glue gun.
A spool of thermoplastic filament (PLA, ABS, PETG, nylon) feeds into a heated nozzle. The nozzle melts the plastic and moves in a programmed pattern, depositing molten material onto the build platform. As the plastic cools, it solidifies and bonds to the layer below.
Layer by layer, the object grows.
Strengths:
- Affordable equipment and materials
- Wide material selection
- Large build volumes possible
- Good for functional prototypes
Limitations:
- Visible layer lines
- Moderate precision (±0.1-0.4mm)
- Requires supports for overhangs
Vat Photopolymerization (SLA, DLP)
Instead of melting plastic, these technologies use light to cure liquid resin.
Stereolithography (SLA) uses a UV laser to trace each layer on the surface of a vat of photopolymer resin. Where the laser hits, resin solidifies. After each layer, the build platform lowers, fresh resin flows over the top, and the next layer cures.
Digital Light Processing (DLP) works similarly but uses a projector to cure entire layers at once. A digital micromirror device reflects UV light onto the resin in the shape of the entire layer, curing it simultaneously. This can be faster than SLA's point-by-point approach.
Strengths:
- Extremely high precision (layers as thin as 25 microns)
- Smooth surface finish
- Excellent for detailed models
Limitations:
- Expensive materials
- Messy post-processing
- Parts degrade in sunlight without coating
- Resin handling requires care
Powder Bed Fusion (SLS, DMLS)
These technologies use lasers to fuse powder particles.
Selective Laser Sintering (SLS) spreads a thin layer of powder—typically nylon—across a build platform. A laser scans the shape of the layer, heating powder particles just enough to fuse them together. After each layer, fresh powder spreads over the top, and the process repeats. Unsintered powder surrounds the part, providing natural support.
Direct Metal Laser Sintering (DMLS) does the same thing with metal powder. A high-energy laser fully melts metal particles, creating dense, strong parts.
Strengths:
- No support structures needed
- Durable, functional parts
- Excellent mechanical properties
- Complex geometries possible
Limitations:
- Very expensive equipment
- Rough surface finish
- Powder handling is messy
- Slow process
What Happens After Printing?
The printer finishes. The part comes out. But it's not ready to use yet.
Removing Support Structures
Supports hold up overhangs during printing. Afterward, they must come off.
For FDM parts, supports snap or cut away. Pliers, wire cutters, or a sharp knife do the job. If soluble supports were used, dissolving them in water or solvent leaves clean surfaces.
For SLA parts, supports are more delicate. Careful removal with flush cutters prevents damage to the main object.
Sanding and Polishing
Layer lines are real. Even high-resolution prints show some texture.
Sanding smooths surfaces. Start with coarse grit (80-120) to remove obvious lines. Progress to medium (220-320), then fine (400-800) for a smooth finish. Wet sanding with fine grit eliminates scratches.
Polishing creates shine. Compounds and buffing wheels bring surfaces to a high gloss. For parts that need to look perfect, this step is essential.
Sintering (for Metal Parts)
Metal prints from DMLS come out of the printer slightly porous and with residual stress. Heat treatment in a furnace densifies the material and relieves stress. The part emerges stronger and more durable.
Dyeing and Coating
Dyeing adds color to materials that absorb it. Nylon SLS parts can be dyed in various colors after printing.
Coating protects surfaces. Clear coats seal porous materials. Paint adds color and hides layer lines. Metal coatings prevent corrosion. The right finish extends part life and improves appearance.
What Can Layer-by-Layer Printing Actually Make?
Healthcare: Custom Solutions for Real People
Prosthetics have been transformed. Traditional prosthetics are expensive and one-size-fits-most. 3D-printed versions cost a fraction and fit perfectly because they're designed from scans of the actual patient. The World Health Organization notes that 3D-printed prosthetics can reduce costs by up to 70% compared to traditional methods .
Dental applications are routine now. Crowns, bridges, and clear aligners are printed daily. Digital impressions from intra-oral scanners feed directly into printers. Turnaround drops from days to hours. The American Dental Association reports 95% accuracy in fit for 3D-printed dental appliances .
Surgical guides improve outcomes. By printing guides based on patient scans, surgeons place implants with precision impossible through freehand techniques. A study in the Journal of Arthroplasty found that 3D-printed guides reduced alignment error by 50% in knee replacements .
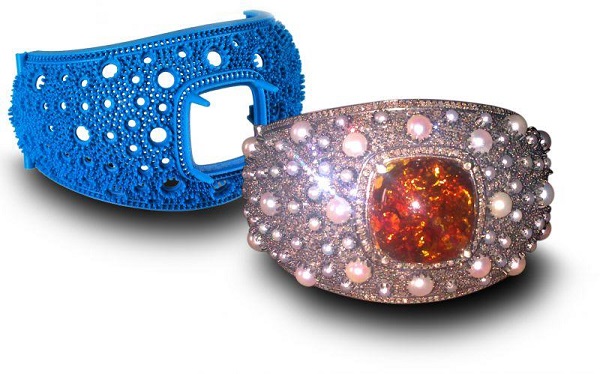
Fashion: Where Creativity Meets Technology
Avant-garde designs push boundaries. Designer Iris van Herpen uses 3D printing to create garments with organic, impossible shapes. Her pieces appear in museums and fashion shows worldwide.
Personalized fashion appeals to consumers. Seventy percent of shoppers express interest in customized 3D-printed fashion items, according to a Fashion Institute of Technology survey . Custom-fit shoes, bespoke jewelry, made-to-measure accessories—all become practical.
Sustainable practices benefit from printing's low waste. The Ellen MacArthur Foundation estimates that 3D printing in fashion could reduce material waste by up to 80% compared to traditional cut-and-sew methods .
Aerospace: Lightweight and Strong
Aircraft components demand strength without weight. Traditional machining wastes up to 90% of expensive titanium. 3D printing uses only what's needed.
GE Aviation prints fuel nozzles that were once assembled from 20 pieces. The printed version is one piece, 25% lighter, and five times more durable. Every gram saved means fuel savings over the aircraft's life.
Automotive: Faster Development
Prototyping cycles shrink from weeks to days. Design, print, test, refine—all in the time traditional methods would still be making tooling.
Ford's 3D-printed Mustang dashboard saved 30% in cost and reduced weight by 50%. Better fuel economy, faster time to market, more design iterations.
Why Does Understanding Layers Matter?
For hobbyists, understanding layers helps troubleshoot. Poor adhesion? Adjust temperature. Visible lines? Try thinner layers or post-processing. Warping? Check cooling.
For designers, layer understanding guides decisions. Orientation affects strength. Layer lines affect aesthetics. Support requirements affect geometry.
For businesses, layer understanding drives technology selection. Need smooth surfaces? Choose SLA, not FDM. Need strength? SLS or metal. Need speed? Optimize layer height.
The layer-by-layer nature of 3D printing isn't just a technical detail. It's the key to everything the technology enables.
Conclusion: Layers Make the Magic
Every 3D printed object tells a story in layers. Each layer bonds to the one below, building complexity from simplicity.
The process isn't magic—it's engineering. Digital models become physical through careful slicing, precise deposition, and thoughtful post-processing. Understanding each step lets you control the outcome.
From medical implants that save lives to fashion pieces that inspire, from aerospace components that fly to prototypes that test ideas—all emerge from the same fundamental process.
Layer by layer, the future gets built.
Frequently Asked Questions
What are the most common 3D printing materials?
Thermoplastics like PLA, ABS, and PETG dominate FDM printing. Photopolymer resins are standard for SLA and DLP. Nylon powder is common for SLS. Metal powders—titanium, stainless steel, aluminum—are used in DMLS. Each material family serves different applications.
How can I improve surface quality on my prints?
Use thinner layer heights during slicing (0.1mm instead of 0.2mm). Sand with progressively finer grits after printing. For resin prints, proper washing and curing improves finish. Choose SLA or DLP over FDM when surface quality is critical.
Is 3D printing cost-effective for large-scale production?
Currently, no. Traditional manufacturing wins for high volumes due to economies of scale. 3D printing excels at prototyping, customization, and low-volume production. The breakeven point varies but typically falls below 1,000 units for most applications.
How strong are 3D printed parts compared to traditionally manufactured ones?
Properly printed parts can be very strong. FDM parts are weaker across layer boundaries (anisotropic). SLS and metal prints approach or match traditional material properties. Orientation, infill, and post-processing all affect final strength.
What causes layer adhesion problems?
Insufficient temperature, too-fast printing, or contaminated material. Each layer must bond to the previous one. If temperatures are too low, bonding fails. If printing is too fast, material doesn't fuse properly. Moisture in filament causes bubbles and weak layers.
Contact Yigu Technology for Custom Manufacturing
Need parts built layer by layer with precision and reliability? At Yigu Technology, we've mastered every major 3D printing technology. FDM, SLA, SLS, metal—we match the right process to your requirements.
From prototypes to production runs, we deliver quality you can measure. Contact us today to discuss your project. Let's build something great together.