Introduction
Imagine holding a model of a human heart that is completely clear—you can see every chamber, every vessel, every internal detail. Or a prototype of a lens that lets you see through it exactly as the final product will. Or an architectural model where you can see both the exterior and interior structures simultaneously. Transparent 3D printing makes all this possible. By using specialized materials and precise processes, it creates see-through objects with remarkable clarity. From medical visualization to architectural design to consumer products, transparent 3D printing is opening new possibilities across industries. This guide explains how transparent 3D printing works, the materials and techniques involved, and the applications transforming how we see and create.
What Is Transparent 3D Printing?
Definition and Basic Concept
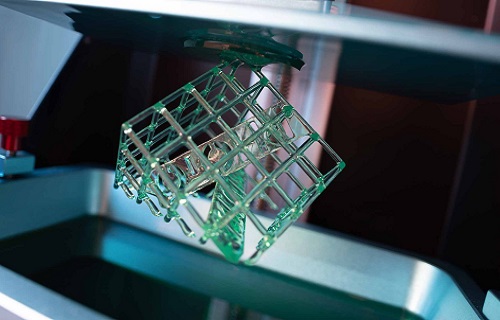
Transparent 3D printing is the process of creating see-through objects using additive manufacturing. Unlike traditional opaque prints, transparent prints require materials that permit light to pass through them and processes that minimize defects that scatter light.
The challenge: 3D printing naturally creates layer lines, tiny voids, and surface roughness—all of which scatter light and reduce transparency. Achieving optical clarity requires:
- Specialized transparent materials
- Precise control of printing parameters
- Careful post-processing to eliminate imperfections
How It Differs from Opaque Printing
| Factor | Opaque Printing | Transparent Printing |
|---|---|---|
| Material | Standard resins, filaments | Specially formulated transparent resins |
| Layer lines | Can be visible—often acceptable | Must be invisible—scatter light |
| Surface finish | May be rough—can be sanded | Must be smooth—optical quality |
| Internal voids | Minor issue | Major problem—scatter light |
| Post-processing | Optional | Essential for clarity |
The Evolution of Transparent 3D Printing
3D printing began in the 1980s with opaque materials. Early attempts at transparency faced quality limitations—cloudy prints, visible layer lines, poor optical properties. Continuous improvements in materials, printers, and post-processing techniques have now enabled high-resolution, clear prints that rival traditionally manufactured transparent parts.
What Materials Are Used in Transparent 3D Printing?
Types of Transparent Resins and Polymers
| Material | Key Properties | Best Applications |
|---|---|---|
| Acrylic-Based Resins | Good clarity, moderate strength, easy to print | Lenses, light guides, decorative items |
| Epoxy Resins | High strength, heat resistant, excellent clarity | Industrial parts, functional prototypes |
| Polycarbonate (PC) | Exceptional impact resistance, good clarity | Safety equipment, protective covers |
| PMMA (Acrylic Glass) | High optical clarity, weather resistant | Architectural models, displays |
| Silicone-Based Resins | Flexible, soft, transparent | Soft robotics, medical devices |
Acrylic-Based Resins
Properties: Good balance of clarity and mechanical strength. Relatively low viscosity makes them suitable for fine details.
Applications: Eyeglasses, lenses, decorative items, light guides.
Why choose: Excellent for applications where optical clarity is important but extreme durability isn't required.
Epoxy Resins
Properties: Exceptional strength, heat resistance, and clarity when properly cured. More challenging to print but superior properties.
Applications: Industrial components, functional prototypes, parts exposed to heat or stress.
Why choose: When you need transparent parts that must also withstand demanding conditions.
Polycarbonate (PC)
Properties: Remarkable impact resistance—up to 250x stronger than glass. Good optical clarity, though not as clear as acrylic.
Applications: Safety equipment, protective eyewear, durable transparent parts.
Why choose: When transparency and impact resistance are both required.
PMMA (Polymethyl Methacrylate)
Properties: High optical clarity (92% light transmission), excellent weather resistance, good scratch resistance.
Applications: Architectural displays, signage, models requiring long-term clarity.
Why choose: For applications where optical quality and outdoor durability matter.
Silicone-Based Resins
Properties: Flexible, soft, transparent. Can bend and stretch while maintaining clarity.
Applications: Soft robotics, medical devices, flexible light guides.
Why choose: When you need transparent parts that must flex or conform to shapes.
How Does Transparent 3D Printing Work?
Layer-by-Layer Fabrication
Transparent 3D printing uses the same fundamental process as other additive manufacturing—building objects layer by layer. But achieving transparency requires precise control of parameters:
Layer thickness: Thinner layers reduce visible layer lines. For transparent prints, layer heights of 25–50 microns are common—thinner than standard opaque prints.
Exposure time: Proper curing ensures complete polymerization. Under-cured areas create cloudiness. Over-curing can cause yellowing.
Temperature control: Consistent temperature prevents internal stresses that scatter light.
Print orientation: Orientation affects how layer lines interact with light. Some orientations minimize visible lines.
Key Technologies for Transparent Printing
SLA (Stereolithography) : Uses a UV laser to cure liquid resin. Excellent for transparent prints because:
- Very thin layers (down to 25 microns)
- Smooth surfaces as-printed
- Wide range of transparent resins available
DLP (Digital Light Processing) : Projects entire layers at once. Can be faster than SLA but may have slightly lower resolution. Good for transparent prints when properly calibrated.
Material Jetting: Jetted droplets cured by UV light. Can achieve excellent clarity and even multi-material transparent prints.
The Challenge of Achieving True Transparency
Why is transparent 3D printing difficult?
Layer lines: Each layer boundary can scatter light. Eliminating visible layer lines is essential.
Surface roughness: Microscopic roughness scatters light, causing a frosted appearance. Smooth surfaces are critical.
Internal voids: Tiny air bubbles or uncured pockets scatter light and reduce clarity.
Material properties: The resin itself must have low light absorption and uniform refractive index.
Curing uniformity: Inconsistent curing creates density variations that scatter light.
What Post-Processing Is Required for Transparent Prints?
Post-processing is essential for transparent 3D prints. As-printed parts are rarely clear enough for demanding applications.
Step 1: Support Removal
Carefully remove support structures. Any remaining support marks will scatter light and reduce clarity.
Tools: Flush cutters, tweezers, precision knives.
Technique: Cut close to the surface, then sand smooth.
Step 2: Cleaning
Remove all uncured resin. Residue on the surface will cure later, creating a cloudy film.
Process: Rinse in isopropyl alcohol (IPA) or specialized cleaning solution. Ultrasonic cleaning helps reach internal cavities.
Important: Ensure complete drying before proceeding.
Step 3: Sanding
Sanding removes layer lines and surface roughness—essential for optical clarity.
Grit progression:
- Start with 400–600 grit to remove major layer lines
- Progress to 800–1000 grit to smooth surface
- Finish with 1500–2000 grit for near-optical smoothness
Technique: Wet sanding reduces dust and gives better finish. Sand in one direction, then perpendicular, to ensure even removal.
Step 4: Polishing
Polishing transforms a sanded surface from frosted to clear.
Methods:
- Mechanical polishing: Use polishing compounds with soft cloth or felt wheels
- Chemical polishing: Expose to solvent vapors that melt and smooth the surface (requires care)
- Clear coating: Apply optical-grade clear coat
Result: Surface roughness reduced from microns to nanometers—light passes through without scattering.
Step 5: Annealing (for some materials)
Heating the part relieves internal stresses that can cause cloudiness or distortion.
Process: Heat in oven at controlled temperature (material-dependent), then slow cool.
Benefits: Improved clarity, dimensional stability, and mechanical properties.
Step 6: Coating
A final clear protective coating can:
- Enhance transparency by filling microscopic surface defects
- Protect against scratches and UV degradation
- Provide a glossy, professional finish
What Are the Applications of Transparent 3D Printing?
Medical and Scientific Visualization
Transparent 3D printing is transforming how medical professionals see and understand anatomy.
Anatomical models: Surgeons can practice on clear models of organs, seeing internal structures exactly as they are. A transparent heart model reveals chambers, valves, and blood vessels in their true spatial relationships.
Benefits:
- Improved surgical planning
- Better patient education—patients see exactly what will be done
- Enhanced medical training—students visualize anatomy in 3D
Real-world example: Surgeons at a children's hospital used a transparent 3D-printed heart model to plan a complex congenital defect repair. The model revealed internal structures in a way 2D images could not, enabling a more precise approach.
Architectural and Design Modeling
Architects and designers use transparent prints to create models that show both exterior and interior simultaneously.
Architectural models: A transparent building envelope reveals interior spaces, structural elements, and lighting effects. Stakeholders see the complete design at once.
Product design: Transparent prototypes show internal components, assembly fit, and how light interacts with the product.
Benefits:
- Better design communication
- Early identification of spatial issues
- Impressive client presentations
Real-world example: An architectural firm created a transparent 3D-printed model of a proposed museum. The clear exterior let clients see gallery layouts, circulation paths, and natural light penetration—all in one model.
Entertainment and Visual Effects
The entertainment industry uses transparent 3D printing for props, set pieces, and special effects.
Movie props: Transparent weapons, futuristic devices, magical artifacts with internal glowing elements.
Stage design: Transparent set pieces that can be lit from within or behind for dramatic effects.
Special effects: Models for stop-motion animation, practical effects that require see-through elements.
Benefits:
- Unique visual effects
- Integration with lighting
- Custom designs impossible with traditional methods
Optics and Lighting
Transparent 3D printing enables custom optical components and lighting elements.
Lenses: Custom lenses for prototypes, research, or specialized applications. Complex aspheric shapes become practical.
Light guides: Internal channels that direct light exactly where needed. Can be designed with complex geometries impossible to mold.
Diffusers: Custom diffusion patterns for uniform lighting.
Benefits:
- Rapid prototyping of optical components
- Custom designs for specific applications
- Integration of multiple optical elements in one part
Consumer Products
Transparent 3D printing enables new possibilities in consumer goods.
Eyewear: Custom frames with clear sections, integrated features.
Jewelry: Clear elements, encapsulated objects, unique designs.
Home decor: Vases, lamps, decorative objects with internal structures visible.
Benefits:
- Unique, personalized products
- Design freedom beyond traditional manufacturing
- Small-batch production without tooling
What Are the Challenges of Transparent 3D Printing?
Achieving Consistent Clarity
Even with careful post-processing, achieving perfectly clear prints can be challenging. Variations in material, printer calibration, and post-processing technique all affect final clarity.
Material Limitations
Not all transparent materials are available for all printing technologies. Some materials require specific printers or post-processing equipment.
Post-Processing Time and Skill
Achieving optical clarity requires significant time and skill. Sanding and polishing must be done carefully to avoid distorting the part. Chemical polishing requires experience to avoid damaging the print.
Cost
Transparent resins are more expensive than standard materials. Post-processing adds labor time. For applications requiring optical clarity, the cost is justified—but it's higher than opaque printing.
Size Limitations
Most transparent printing technologies have limited build volumes. Large transparent parts must be printed in sections and assembled.
How Does Yigu Technology Approach Transparent 3D Printing?
As a non-standard plastic and metal products custom supplier, Yigu Technology offers transparent 3D printing for applications where clarity matters.
Our Experience
Medical client: Needed transparent anatomical models for surgical planning. We printed in high-clarity resin, then polished to optical finish. Surgeons used the models to plan complex procedures.
Product designer: Required clear prototypes to show internal mechanisms. We delivered parts that revealed assembly details, enabling client presentations that impressed stakeholders.
Research institution: Needed custom light guides for an optical experiment. We designed and printed complex internal channels that directed light precisely as required.
Our Capabilities
- SLA printing with high-clarity transparent resins
- Precision post-processing including sanding, polishing, and coating
- Design assistance for optimizing parts for transparency
- Quality verification—we measure clarity and inspect for defects
Quality Commitment
We understand that transparent prints demand higher standards. Every part is inspected for clarity, surface finish, and dimensional accuracy.
Conclusion
Transparent 3D printing opens possibilities that opaque printing cannot match:
- Medical: See-through anatomical models for surgical planning and education
- Architecture: Models that reveal both exterior and interior simultaneously
- Entertainment: Props and set pieces with unique visual effects
- Optics: Custom lenses, light guides, and diffusers
- Consumer: Unique jewelry, eyewear, and decorative objects
Achieving transparency requires:
- Specialized materials—transparent resins formulated for optical clarity
- Precise printing—thin layers, controlled parameters, minimal defects
- Careful post-processing—sanding, polishing, annealing, coating
The results are worth the effort. Parts that not only function but reveal their inner workings. Models that communicate design intent completely. Products that capture light in beautiful ways.
For medical professionals, architects, designers, and creators, transparent 3D printing is a powerful tool. It lets you see what was previously hidden—and that changes everything.
Frequently Asked Questions
Q1: What are the main advantages of using transparent 3D printing?
Key advantages include:
- Visualize internal structures—see inside without cutting
- Enhanced visual appeal—unique aesthetic possibilities
- Improved functionality—light guides, optical components
- Better communication—models that show everything at once
Q2: What materials are commonly used for transparent 3D printing?
Common materials include acrylic-based resins (good clarity, easy to print), epoxy resins (high strength, heat resistant), polycarbonate (impact resistant), PMMA (high optical clarity), and silicone-based resins (flexible, transparent).
Q3: How does post-processing affect the transparency of 3D prints?
Post-processing is essential. Sanding removes layer lines, polishing transforms frosted surfaces to clear, annealing relieves internal stresses, and coating protects and enhances clarity. Without proper post-processing, prints remain cloudy.
Q4: Can transparent 3D printed parts be as clear as glass?
With proper material selection and post-processing, they can approach optical clarity. However, achieving true glass-like clarity (like high-end optical glass) remains challenging. For most applications, the clarity is more than sufficient.
Q5: How long does transparent 3D printing take?
Print time depends on part size and layer thickness. A small part might print in 1–3 hours. Post-processing adds significant time—sanding and polishing can take 1–4 hours depending on part complexity.
Q6: Is transparent 3D printing expensive?
Transparent resins cost more than standard materials—typically $100–$300 per liter. Post-processing adds labor. For applications requiring optical clarity, the cost is justified. For simple prototypes, standard materials may be more economical.
Q7: What industries use transparent 3D printing most?
Medical (anatomical models, surgical planning), architecture (design models), entertainment (props, effects), optics (lenses, light guides), and consumer products (jewelry, eyewear) all benefit significantly.
Contact Yigu Technology for Custom Manufacturing
Ready to explore transparent 3D printing for your next project? At Yigu Technology, we combine material expertise with precision post-processing. Our team helps you select the right materials, optimize designs for clarity, and deliver parts that reveal what's inside.
Visit our website to see our capabilities. Contact us today for a free consultation and quote. Let's bring clarity to your next creation.