Introduction
Imagine holding a fully detailed replica of a V8 engine in your hands—every piston, valve, and cooling passage visible and tangible. Now imagine that model went from digital design to physical object in just a few days, cost a fraction of traditional prototyping, and you can modify it instantly for the next iteration. This is the power of 3D printed engine models. Whether you're an engineer validating a new design, an educator teaching students about internal combustion, or a collector recreating a piece of automotive history, 3D printing transforms how we create and interact with engine representations. In this article, we'll explore how 3D printed engine models work, the materials and technologies involved, and how they can revolutionize your projects—from rapid prototyping to functional testing.
What Exactly Is a 3D Printed Engine Model?
Defining the Concept
A 3D printed engine model is a physical replica of an engine created using additive manufacturing technology. Unlike traditional models made through casting, machining, or injection molding, 3D printed versions start as digital designs and are built layer by layer from materials like plastic, resin, or metal.
These models serve multiple purposes:
- Educational tools for teaching engine mechanics
- Design validation prototypes for engineers
- Display pieces for collectors and museums
- Functional testbeds for flow analysis or fitment checks
- Custom components for hobbyist projects
How They Differ from Traditional Engine Models
Traditional engine model manufacturing has significant limitations:
| Aspect | Traditional Methods | 3D Printing |
|---|---|---|
| Tooling cost | High (molds, dies) | None |
| Lead time | Weeks to months | Hours to days |
| Design changes | Expensive, slow | Free, instant |
| Complexity | Limited by tooling | Unlimited |
| Material options | Production materials | Wide range |
| Minimum quantity | Usually 100+ for economy | One piece economical |
For example, creating a complex internal combustion engine model with traditional methods might require multiple molds for different parts—each costing thousands of dollars. A design change means modifying or rebuilding molds. With 3D printing, you update the digital file and print a new version immediately.
How Does 3D Printing Create Engine Models?
The Layer-by-Layer Process
All 3D printing builds objects layer by layer, but different technologies achieve this in different ways:
For plastic models (FDM - Fused Deposition Modeling) :
- A plastic filament (like ABS or PLA) feeds into a heated nozzle
- The nozzle melts the plastic and deposits it precisely
- Each layer bonds to the one below as it cools
- The process repeats hundreds or thousands of times
A 10cm tall engine model might require 500-1000 layers, each 0.1-0.2mm thick. Printing time ranges from a few hours to several days depending on size and detail.
For resin models (SLA - Stereolithography) :
- A laser cures liquid photopolymer resin layer by layer
- Each layer is drawn with incredible precision
- Layer thickness can be as low as 0.025mm
- Results are smoother and more detailed than FDM
For metal models (SLS/SLM - Selective Laser Sintering/Melting) :
- Metal powder spreads in thin layers
- A laser fuses powder particles where the model requires
- Unfused powder supports the part during printing
- After printing, parts are heat-treated and finished
Stacking vs. Sintering Technologies
Two main approaches dominate engine model printing:
Stacking technology (FDM, SLA) builds by adding material that solidifies immediately. It's best for:
- Plastics and resins
- Low-melting-point materials
- Quick, cost-effective models
- Educational and display pieces
Sintering technology (SLS, SLM) fuses powders with heat or lasers. It enables:
- Metal and high-temperature materials
- Functional parts with real strength
- Complex internal geometries
- Production-grade components
The choice depends on your goals. A display model might use stacking. A functional test part might need sintering.
The Digital Workflow
Creating a 3D printed engine model follows a proven path:
Step 1: Design or acquire a 3D model
- Create in CAD software (SolidWorks, Fusion 360)
- Download from online repositories
- Scan an existing physical engine
Step 2: Prepare the file
- Convert to STL format
- Check for errors (holes, inverted normals)
- Optimize for printing (wall thickness, overhangs)
Step 3: Slice the model
- Import into slicing software
- Set layer height, infill, supports
- Generate printer instructions (G-code)
Step 4: Print
- Load material
- Start the print
- Monitor for issues
Step 5: Post-process
- Remove supports
- Sand, paint, or finish
- Assemble multiple components
What Materials Work Best for Engine Models?
Plastics: Versatile and Accessible
ABS (Acrylonitrile Butadiene Styrene) is a top choice for functional prototypes:
- Strong and impact-resistant
- Withstands handling and assembly
- Can be sanded, painted, and glued
- Heat resistant to about 100°C
Perfect for educational models that students will handle, or prototype components that need some durability.
PLA (Polylactic Acid) excels for display models:
- Easy to print with smooth surfaces
- Biodegradable and environmentally friendly
- Wide color range
- Low cost
Ideal for detailed showpieces where mechanical strength isn't critical. A beautifully detailed engine block with visible cooling fins prints beautifully in PLA.
PETG combines advantages:
- Stronger than PLA
- Easier to print than ABS
- Chemical and moisture resistant
- Slightly flexible
Great for functional prototypes needing more toughness than PLA.
Nylon brings engineering performance:
- High strength and toughness
- Wear-resistant for moving parts
- Can be dyed after printing
- Heat resistant
Useful for gear trains or components that might experience light loads.
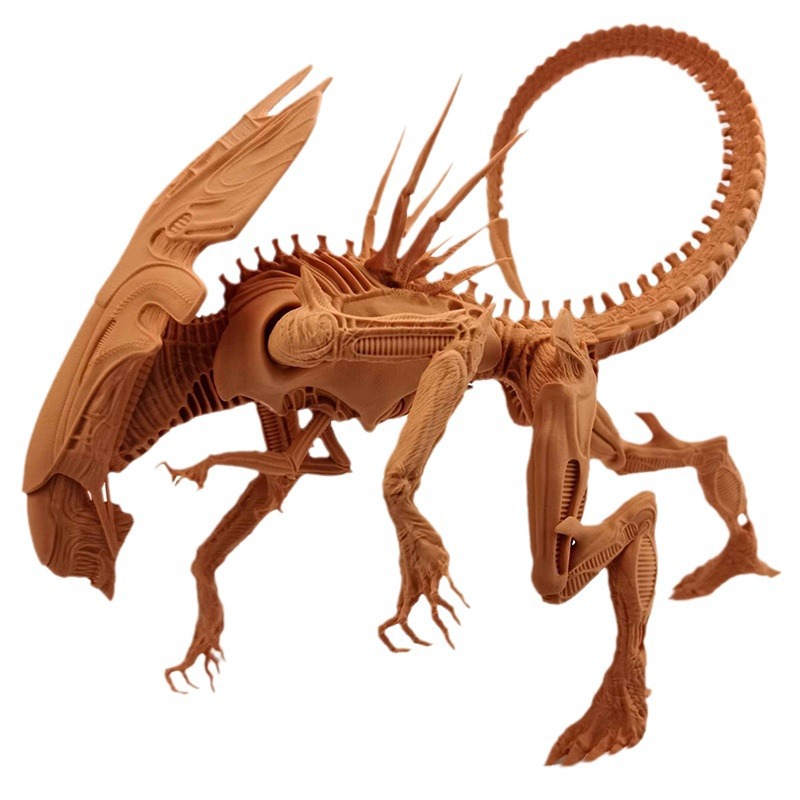
Resins: Unmatched Detail
Standard resins produce incredibly detailed models:
- Layer heights down to 0.025mm
- Smooth surfaces ready for painting
- Captures fine details like valve springs
- More brittle than FDM plastics
Ideal for collector-quality display models where every detail matters.
Engineering resins offer improved properties:
- Tough and durable formulations
- High-temperature options
- Transparent materials for flow visualization
- Castable resins for investment casting
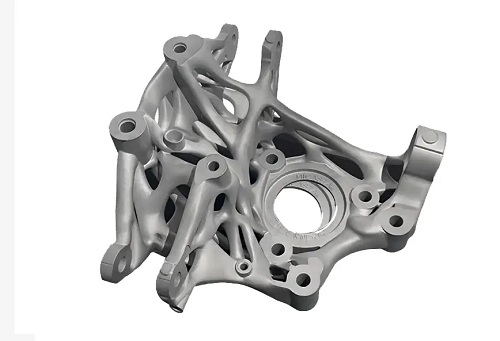
Metals: Production-Grade Performance
Aluminum provides lightweight strength:
- Excellent strength-to-weight ratio
- Good thermal conductivity
- Can be machined after printing
- Corrosion resistant
Perfect for functional prototypes needing metal properties without massive weight.
Stainless steel delivers durability:
- High strength (500-800 MPa tensile)
- Corrosion resistant
- Can be welded or machined
- Production-grade material
Ideal for testing fit and function in real-world conditions.
Titanium offers the ultimate performance:
- Exceptional strength-to-weight
- Biocompatible for medical applications
- Heat resistant to high temperatures
- Aerospace-grade material
Used for high-performance prototypes and specialized applications.
Tool steel enables actual production tooling:
- Hard, wear-resistant
- Can be heat-treated
- Makes injection molds or dies
Material Comparison Table
| Material | Detail Level | Strength | Heat Resistance | Cost | Best Use |
|---|---|---|---|---|---|
| PLA | Medium | Low | Low (60°C) | $ | Display models |
| ABS | Medium | Medium | Medium (100°C) | $$ | Educational, prototypes |
| PETG | Medium | Medium | Medium (80°C) | $$ | Functional prototypes |
| Resin | Very High | Low | Low (50°C) | $$$ | Collector displays |
| Nylon | Medium | High | High (150°C) | $$$ | Moving parts |
| Aluminum | High | High | Very High | $$$$ | Functional metal parts |
| Steel | High | Very High | Very High | $$$$$ | Production prototypes |
What Should You Consider Before Printing?
Design Optimization for Success
Avoid problematic overhangs:
- Features extending horizontally without support may sag
- Design supports or orient parts to minimize overhangs
- Use angles under 45 degrees from vertical for self-supporting features
Maintain consistent wall thickness:
- Variations cause uneven cooling and warping
- Keep walls between 1-3mm for most plastics
- Thicker sections may need hollowing to save material and reduce stress
Include assembly features:
- Design alignment pins for multi-part models
- Add clearance holes for hardware
- Consider snap-fits for tool-free assembly
Account for material properties:
- Plastics shrink as they cool
- Metals shrink during sintering
- Design slightly oversize and post-process critical features
Printer Selection Factors
Build volume determines maximum part size:
- Desktop printers: 200-300mm cube
- Industrial printers: Up to 1 meter+
- Consider splitting large models into multiple parts
Resolution affects detail capture:
- 50-100 micron layers for good detail
- 25-50 micron for exceptional detail
- 100-200 micron for quick prototypes
Technology matches your needs:
- FDM: Large parts, low cost, functional prototypes
- SLA: High detail, smooth surfaces, display models
- SLS: Strong parts, complex geometry, no supports
- Metal: Production-grade, functional testing
Material Selection Criteria
For display models:
- PLA offers color variety and low cost
- Resin provides unmatched detail
- Paint can enhance either option
For educational use:
- ABS withstands student handling
- Larger FDM prints keep costs down
- Clear resins show internal passages
For functional testing:
- Match material properties to test requirements
- Consider temperature, load, and environment
- Metal may be necessary for realistic behavior
For assembly verification:
- Any material works for fit checks
- Consider printing critical interfaces only
- Use lower-cost materials for initial iterations
How Are 3D Printed Engine Models Used?
Engineering and Product Development
Design validation accelerates development:
- Test fitment of engine components
- Verify assembly sequences
- Check clearance and interference
- Evaluate ergonomics for maintenance access
Example: An automotive engineer designs a new intake manifold. Instead of waiting weeks for a cast prototype, they print multiple iterations in days, testing airflow, fitment, and manufacturability. Each iteration costs a fraction of traditional methods.
Flow visualization using transparent resins:
- Print clear models of coolant passages
- Use dyed fluids to observe flow patterns
- Identify dead zones and turbulence
- Optimize designs before production
Stress analysis through physical testing:
- Print prototypes in engineering plastics
- Apply loads to validate FEA predictions
- Identify failure modes early
- Reduce risk before committing to tooling
Education and Training
Classroom demonstrations come alive:
- Students see and touch engine components
- Complex concepts become tangible
- Disassemblable models show internal workings
- Multiple copies allow hands-on learning
Example: A university engineering department prints 20 identical engine models for their thermodynamics lab. Each student group examines the model, identifies components, and understands flow paths—all without expensive equipment or safety concerns.
Vocational training benefits similarly:
- Future mechanics learn component identification
- Assembly practice without real engines
- Study cross-sections showing internal features
- Understand systems before touching real vehicles
Collectors and Hobbyists
Rare engine replicas become accessible:
- Print models of engines no longer manufactured
- Create scale versions of iconic powerplants
- Display pieces that would cost fortunes to buy
- Customize colors and finishes
Example: A collector wants a model of a rare 1960s racing engine. Original parts are unobtainable, and full-scale replicas cost hundreds of thousands. They find a 3D model online, scale it to desired size, and print a detailed replica in resin for under $100.
Functional miniature engines challenge hobbyists:
- Print small-scale internal combustion engines
- Some actually run on compressed air or fuel
- Learn engine principles through building
- Impressive display pieces when complete
Art and Display
Museum exhibits use printed models:
- Visitors can touch replicas of priceless originals
- Multiple copies travel to different locations
- Damaged originals stay safely stored
- Interactive displays show internal workings
Film and theater props:
- Create period-appropriate engines
- Build lightweight versions for easy handling
- Modify designs for camera access
- Produce multiples for stunt scenes
What Challenges Might You Face?
Accuracy Limitations
Even the best printers have tolerances:
- FDM: ±0.2-0.5mm typical
- SLA: ±0.1-0.2mm achievable
- Metal: ±0.05-0.1mm with post-processing
For precise fits, design accordingly:
- Test-print critical interfaces
- Allow clearance for assembly
- Plan post-processing for precision features
Material Property Gaps
3D printed materials don't match wrought properties:
- Layer lines create weak points
- Metal parts need heat treatment
- Plastics may lack required strength
- Temperature limits differ
Understand your requirements:
- What loads will the model experience?
- What temperatures will it see?
- Will it contact fluids or chemicals?
Size Constraints
Most printers max out under 300mm:
- Large engines require splitting
- Joining parts adds complexity
- Seams may need hiding or finishing
- Alignment becomes critical
Plan for assembly:
- Design alignment features
- Include fastener locations
- Consider adhesive bonding
- Test-fit before final finishing
Post-Processing Requirements
Raw prints rarely look finished:
- Support marks need removal
- Layer lines may need sanding
- Painting requires preparation
- Assembly takes time
Factor this into your timeline:
- Simple models: 1-2 hours post-processing
- Complex models: Days of finishing work
- Metal parts: Professional services often needed
How Do Costs Compare?
Cost Breakdown by Technology
| Technology | Equipment Cost | Material Cost per Part | Post-Processing | Total for Simple Engine Model |
|---|---|---|---|---|
| FDM (home) | $200-2,000 | $5-20 | Low | $10-30 |
| FDM (service) | N/A | $50-200 | Included | $50-200 |
| SLA (home) | $200-3,000 | $10-40 | Medium | $20-60 |
| SLA (service) | N/A | $100-400 | Included | $100-400 |
| SLS nylon | N/A | $200-600 | Included | $200-600 |
| Metal (service) | N/A | $500-2,000+ | Professional | $500-2,000+ |
Traditional vs. 3D Printed Cost Comparison
For a complex engine prototype:
| Cost Factor | Traditional (Cast/Machined) | 3D Printed |
|---|---|---|
| Tooling | $5,000-50,000 | $0 |
| First part | $500-5,000 | $100-1,000 |
| Design change | $1,000-10,000 (new tooling) | $0 (modify file) |
| Second iteration | $500-5,000 (if new tooling avoided) | $100-1,000 |
| Total for 3 iterations | $6,500-65,000+ | $300-3,000 |
The savings multiply with each design change.
What Does the Future Hold?
Larger Printers
Industrial printers now handle engine-block sized parts. Eventually, printing full-scale engine components for functional testing will become routine.
Multi-Material Printing
Printers that combine materials in single jobs will create models with:
- Rigid blocks and flexible seals
- Transparent windows for flow visualization
- Conductive traces for sensors
- Color-coded components
Faster Printing
Multi-laser systems and improved processes already cut print times by 50-80%. Tomorrow's printers will deliver complex models overnight.
Better Materials
New materials will bridge the gap between prototype and production:
- Higher temperature resistance
- Improved strength and toughness
- Better surface finish
- Lower cost
Integrated Electronics
Printed models with embedded sensors will provide real-time data on stress, temperature, and flow during testing.
Conclusion
3D printed engine models truly can revolutionize your projects. They eliminate tooling costs, accelerate design iterations, and enable complexity impossible with traditional methods. Whether you need a display-quality replica, a functional prototype, or an educational tool, 3D printing delivers results in days instead of weeks. At Yigu Technology, we've helped engineers, educators, and collectors bring their engine visions to life. The technology continues advancing, but the core benefits remain: speed, flexibility, and design freedom. Your next engine model could be just a print away.
FAQs
What materials are best for 3D printing an engine model?
For display models, resin offers the finest detail. For educational use, ABS provides durability. For functional prototypes, nylon or metal deliver required properties. The best material depends on your specific goals—detail, strength, or cost.
How accurate can a 3D printed engine model be?
Professional printers achieve ±0.1-0.2mm accuracy for plastic, ±0.05-0.1mm for metal. Resolution (layer height) can be as fine as 0.025mm for resin printers. This captures most engine details faithfully.
Can I 3D print a functional engine model?
Yes, for limited definitions of "functional." Hobbyists have printed small engines that run on compressed air or even fuel. However, production engines require materials and precision beyond current 3D printing for most applications. Functional prototypes for fit, flow, or basic testing are absolutely achievable.
How long does it take to 3D print an engine model?
A small model might print in 3-6 hours. A detailed, multi-part engine could take 2-5 days total including design, printing, and assembly. Compare this to weeks for traditional prototyping.
Can I print moving engine parts?
Yes! Print-in-place mechanisms like pistons in cylinders can print as single assemblies. After printing and cleaning, they move freely. For more complex assemblies, print individual components and assemble.
Contact Yigu Technology for Custom Manufacturing
Ready to revolutionize your next project with a 3D printed engine model? At Yigu Technology, we combine years of additive manufacturing expertise with precision equipment. Our team helps you select the right materials, optimize designs for printing, and deliver quality models on schedule. Whether you need an educational display, engineering prototype, or collector's replica, we provide professional service and competitive pricing. Contact us today to discuss your requirements. We'll guide you through the possibilities and show you how 3D printed engine models can transform your work.