Introduction
You have a great product idea. You’ve sketched it, modeled it in CAD, and run simulations. But nothing compares to holding a physical prototype in your hands—testing how it feels, how it fits, how it performs.
That’s where prototyping injection molding comes in. It bridges the gap between digital design and production reality. Unlike 3D printing, which produces parts layer by layer, prototyping injection molding uses real production-grade materials and processes. The result? Prototypes that accurately represent how your final product will look, feel, and function.
At Yigu Technology, we’ve helped countless product developers move from concept to market faster by using prototyping injection molding. In this guide, we’ll walk through the process, the equipment, the material choices, and the design considerations that make this approach so valuable.
What Exactly Is Prototyping Injection Molding?
Prototyping injection molding applies the same principles as production injection molding—but scaled for early-stage development. The goal is to create physical models that allow you to test, refine, and validate your design before committing to expensive production tooling.
The process follows the same basic steps as full-scale molding:
- Material preparation: Plastic granules are loaded into the machine
- Heating and melting: The material melts to a viscous state
- Injection: Molten plastic is forced into a mold cavity under high pressure
- Cooling and solidification: The part cools and takes its final shape
- Ejection: The mold opens and the part is removed
The key difference is the mold. Production molds are built for millions of cycles, using hardened steel. Prototyping molds are often simpler, using aluminum or soft steel, and are designed for hundreds or thousands of cycles—not millions.
Precision matters: Modern prototyping injection molding achieves tolerances as low as ±0.05mm , allowing you to evaluate fit, form, and function with confidence.
How Does the Process Work Step by Step?
Understanding each stage helps you plan your project and avoid common pitfalls.
Step 1: Material Selection and Preparation
Choose the material that matches your intended production material—or a close equivalent. Common prototyping materials include:
| Material | Properties | Typical Applications |
|---|---|---|
| ABS | High impact resistance, good surface finish | Electronics housings, consumer goods |
| PLA | Biodegradable, low cost, easy to process | Sustainable products, concept models |
| Polypropylene (PP) | Chemical resistance, flexibility | Containers, living hinges |
| Polycarbonate (PC) | High impact strength, optical clarity | Lenses, protective covers |
Pellets are loaded into the machine’s hopper. Some materials—especially nylons and other hygroscopic plastics—require drying to remove moisture that would otherwise cause bubbles or surface defects.
Step 2: Heating and Melting
Pellets feed into a heated barrel where a reciprocating screw rotates, pushing material forward. External heating bands and frictional heat from the screw raise the temperature to the material’s melting point.
Typical melt temperatures:
- ABS: 220–260°C
- PLA: 180–220°C
- Polypropylene: 200–250°C
The result is a homogeneous, viscous liquid ready for injection.
Step 3: Injection
The screw stops rotating and moves forward like a plunger, forcing molten plastic through a nozzle and into the mold cavity.
Injection pressure: Typically 50–200 MPa, depending on material and part complexity
Injection speed: Usually 30–150 mm/s
Higher pressure and speed help fill thin sections and intricate details. But too much speed can trap air, causing burn marks or voids.
Step 4: Cooling and Solidification
Once the cavity fills, cooling begins. The mold contains cooling channels—passages that circulate water or coolant to extract heat.
Cooling time: A small, simple part may cool in 5–10 seconds. A larger, complex part can take 60–120 seconds.
During cooling, the plastic shrinks. Mold designers account for this shrinkage—typically 0.4–2.0% depending on material—to ensure final dimensions match specifications.
Step 5: Mold Opening and Ejection
When the part is solid enough, the mold opens. The mold has two halves: stationary and moving. Hydraulic or mechanical systems separate them.
Ejector pins—small rods in the mold—push the part out. Proper pin placement prevents damage to delicate features.
Step 6: Post-Processing
The prototype may need minor finishing:
- Trimming: Removing flash (excess plastic) with knives or trimming machines
- Sanding: Smoothing rough surfaces
- Polishing: Achieving desired surface finish
- Coating: Painting, plating, or other treatments for appearance or function
What Equipment Is Used?
Prototyping injection molding requires two main pieces of equipment: the injection molding machine and the mold.
The Injection Molding Machine
The machine has three main systems:
- Injection unit: Hopper, barrel, screw, and nozzle. Melts and injects the plastic.
- Clamping unit: Holds the mold closed during injection and cooling. Clamping force is measured in tons.
- Control system: Manages temperature, pressure, speed, and timing.
For prototyping, machines with 10–100 tons of clamping force are typically sufficient. Smaller machines allow faster setup and lower material consumption.
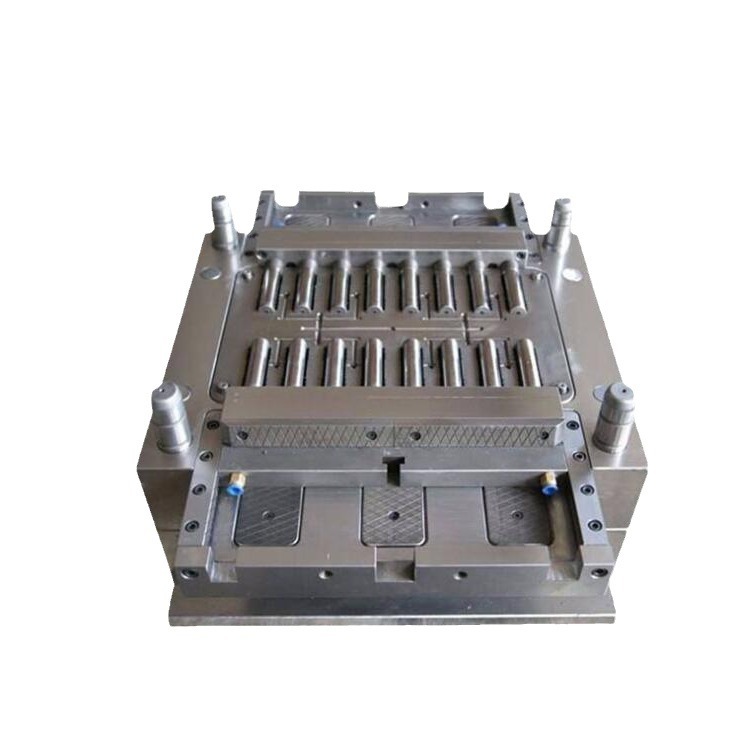
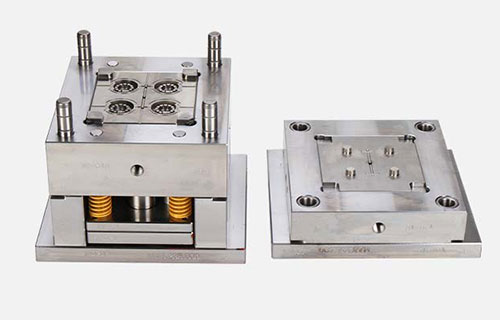
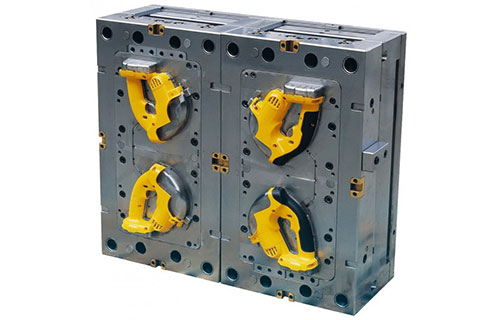
The Mold
The mold is the tool that shapes the part. It’s a precision-crafted cavity—an exact negative of your prototype.
Mold materials:
- Aluminum: Lower cost, faster to machine, suitable for hundreds to thousands of cycles
- Soft steel: Moderate cost, good for thousands to tens of thousands of cycles
- Hardened steel: Higher cost, longer lead time, for high-cycle production—rarely used for pure prototyping
Mold complexity:
- Single-cavity: Produces one part per cycle—simpler, lower cost
- Multi-cavity: Produces multiple parts per cycle—higher throughput for larger runs
Mold features: Cooling channels, ejector pins, and venting (0.02–0.05mm gaps to release trapped air) are all built into the tool.
What Should You Consider Before Starting?
A successful prototyping project starts with planning. Two areas deserve special attention: material selection and design for manufacturability (DFM).
Material Selection
Choose materials based on your prototype’s purpose.
| Consideration | What to Ask |
|---|---|
| Performance | Does the prototype need to match production material properties? Impact resistance? Heat tolerance? Chemical resistance? |
| Cost | Is this a low-cost concept model or a high-fidelity functional prototype? |
| Availability | Is the material readily available? Some engineering plastics have long lead times or minimum order quantities. |
Example: A consumer electronics housing prototype should use ABS—the same material as production—to accurately test impact resistance and surface finish. A purely visual concept model might use less expensive PLA.
Design for Manufacturing (DFM)
DFM principles ensure your part can be molded successfully—even as a prototype.
Avoid thin walls in the mold: When two features are very close together, the mold section between them becomes thin. These “thin iron” areas are weak and prone to breaking or wearing out quickly. This leads to inconsistent part quality and higher mold maintenance costs.
Maintain uniform wall thickness: Uneven walls cause uneven cooling and shrinkage. A thick section cools slower than a thin section, creating internal stresses. The result? Warpage. The part twists or bends as it cools.
Best practice: Keep wall thickness consistent throughout the part. When thickness changes are necessary, use gradual transitions—not abrupt steps.
Add draft angles: Draft is a slight taper on vertical walls that allows the part to release from the mold easily. Without adequate draft (typically 0.5–3°, depending on surface texture and depth), parts can stick, requiring excessive ejection force that damages the part.
Simplify undercuts: Undercuts—features that protrude into the mold—complicate mold design and ejection. For prototyping, simplify where possible. If undercuts are essential, they may require side-action mechanisms (slides or lifters), which add mold complexity and cost.
How Does Yigu Technology Support Prototyping?
At Yigu Technology, we view prototyping injection molding as a critical service—not just a step before production.
Material expertise: We help clients select the right material for their prototype’s purpose. Need to test chemical resistance? We’ll recommend polypropylene. Need impact testing? ABS or polycarbonate. Our team understands the trade-offs between cost, performance, and processability.
DFM consultation: Our engineers review your design before tooling begins. We identify potential issues—thin walls, uneven thickness, insufficient draft—and suggest modifications. Fixing these problems in CAD costs nothing. Fixing them after the mold is built costs time and money.
Precision tooling: We build aluminum and soft steel molds with tight tolerances. Our CNC machining and EDM capabilities ensure cavity accuracy down to ±0.01mm .
Quick turnaround: We understand that development cycles are tight. We prioritize speed without compromising quality. Simple prototyping molds can be completed in 2–4 weeks—getting prototypes into your hands faster.
Quality control: Every prototype is inspected. We check critical dimensions, surface finish, and functionality. If something’s off, we identify the root cause and correct it before the next run.
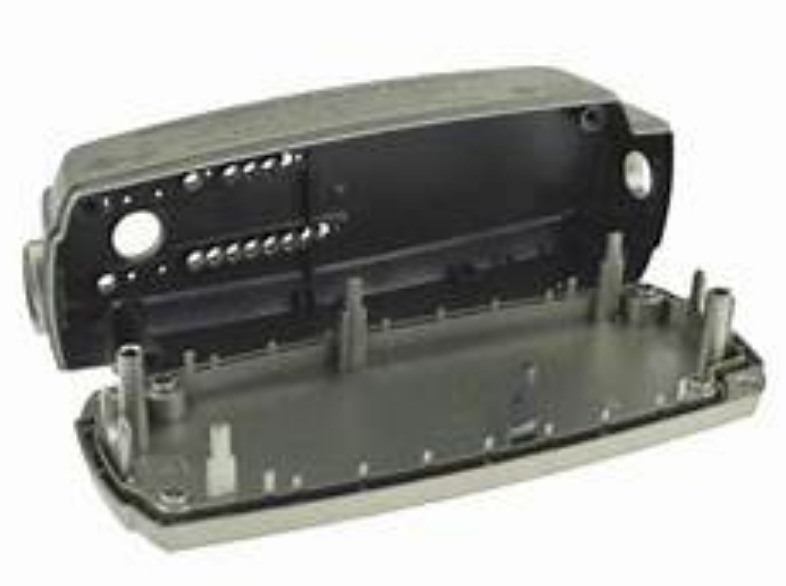
Case example: A medical device startup needed functional prototypes of a handheld diagnostic tool. They had been using 3D-printed parts for early testing, but the material didn’t accurately represent production-grade ABS. We built an aluminum mold in three weeks and delivered 50 prototypes within days of mold completion. The prototypes passed drop testing and chemical resistance validation—giving the team confidence to proceed with production tooling.
Conclusion
Prototyping injection molding is the bridge between digital design and physical reality. It delivers:
- Real materials: Test with production-grade plastics, not just 3D-printing filaments
- Precision: Achieve tolerances that accurately represent final parts
- Speed: Get functional prototypes in weeks, not months
- Confidence: Validate fit, form, and function before committing to production tooling
The process—material preparation, melting, injection, cooling, ejection—mirrors production molding, so results are directly applicable. With proper material selection and DFM principles, prototyping injection molding reduces risk and accelerates development timelines.
For product developers, it’s an essential tool. For manufacturers like Yigu Technology, it’s the starting point for long-term partnerships built on successful product launches.
FAQ
What types of plastics are commonly used in prototyping injection molding?
Common materials include ABS (impact-resistant, good surface finish), PLA (biodegradable, low cost), polypropylene (chemical resistance, flexibility), and polycarbonate (high impact strength, optical clarity). The choice depends on the prototype’s purpose—visual model, functional testing, or material validation. For high-temperature applications, engineering plastics like PEEK may be used, though at higher cost.
How long does the prototyping injection molding process usually take?
Lead time depends on mold complexity and part size. A simple aluminum mold can be completed in 2–4 weeks. Once the mold is ready, actual cycle time per part ranges from 5 seconds to 2 minutes, depending on part size and material. Post-processing adds minimal time. For 50–100 prototypes, total time from design approval to parts in hand is typically 3–6 weeks.
Can prototyping injection molding be used for small-batch production?
Yes. Prototyping molds—especially aluminum molds—are cost-effective for small-batch production runs of hundreds to a few thousand parts. This is ideal for market testing, clinical trials, or fulfilling initial orders while production tooling is underway. The per-part cost is higher than with high-volume steel molds, but total investment is lower because the mold costs less.
How does prototyping injection molding compare to 3D printing?
3D printing is excellent for early concept models and parts that don’t require production-grade material properties. Prototyping injection molding uses actual production materials and processes, so results are directly transferable to mass production. Injection-molded prototypes also have better surface finish, tighter tolerances, and more consistent mechanical properties. The trade-off: injection molding requires mold investment, while 3D printing has no tooling cost.
What is the most common mistake in prototyping injection molding?
Ignoring Design for Manufacturing (DFM) principles. Designers often create parts that look great on screen but are difficult or impossible to mold. Common issues: non-uniform wall thickness (causes warpage), missing draft angles (parts stick in mold), and thin mold sections (weak tooling). Working with an experienced manufacturing partner early—before tooling begins—prevents these problems and saves time and money.
Contact Yigu Technology for Custom Manufacturing
Ready to bring your product concept to life? At Yigu Technology, we specialize in prototyping injection molding and full-scale production. Our team combines material expertise, precision tooling, and DFM consultation to help you move from idea to market faster.
Whether you need functional prototypes for testing or small-batch production for market launch, we have the experience and equipment to deliver. Contact us today to discuss your project and discover how prototyping injection molding can accelerate your development timeline.