Thinking about building your own robot with a 3D printer? This guide covers everything from choosing the right project to materials, electronics, and tips for success—helping you avoid common mistakes and create something amazing.
Introduction
There's something incredibly satisfying about designing and building a robot that actually moves. And with 3D printing, creating custom robot parts has never been more accessible. 3D printed robot projects combine the design freedom of additive manufacturing with the excitement of robotics—letting you create machines that are uniquely yours.
I've spent years at Yigu Technology helping hobbyists, students, and engineers bring their robot ideas to life. Some projects succeed brilliantly. Others fail because of simple mistakes that could have been avoided.
This guide walks you through everything you need to know before starting your first (or next) 3D printed robot project. You'll learn about different robot types, material choices, design considerations, electronics integration, and practical tips that save time and frustration.
Why Build a 3D Printed Robot?
Let's start with why this approach makes sense.
The Advantages of 3D Printing for Robotics
Customization – Every part can be designed exactly for your needs. No searching for off-the-shelf components that almost fit.
Complex geometry – Internal channels, organic shapes, and lightweight structures are possible.
Rapid iteration – Design, print, test, improve—all in days instead of weeks.
Low cost for small runs – No tooling investment. One robot or ten costs about the same per part.
Open-source community – Thousands of designs are freely available to learn from and modify.
Who Builds 3D Printed Robots?
- Hobbyists creating unique projects for fun
- Students learning robotics, programming, and design
- Educators teaching STEM concepts hands-on
- Researchers prototyping new mechanisms
- Engineers testing designs before production
A study in the Journal of STEM Education found that over 80% of students showed increased interest in STEM after participating in hands-on 3D printed robot projects. The tangible results matter.
What Types of 3D Printed Robots Can You Build?
The possibilities are vast, but most projects fall into a few categories.
Robot Arms
3D printed robot arms are among the most popular projects. They range from simple educational models to functional research tools.
Simple educational arms:
- Made from PLA, lightweight and inexpensive
- 3-4 joints for basic movement
- Controlled by simple programming (Arduino, Scratch)
- Teach kinematics and control concepts
Advanced functional arms:
- Use stronger materials (ABS, nylon, or filled filaments)
- Multiple joints with servos or stepper motors
- Can perform pick-and-place operations
- May include end effectors (grippers, suction cups)
Real example: A university robotics lab needed a custom arm for delicate lab automation. Traditional options cost $10,000+. They designed and printed one for $800 in materials that perfectly fit their requirements.
Mobile Robots
Mobile robots move around their environment—on wheels, tracks, or legs.
Wheeled robots are the simplest:
- 3D printed chassis houses batteries, controller, sensors
- Two or four wheels with differential steering
- Can be line-followers, obstacle avoiders, or remote-controlled
Tracked robots handle rough terrain:
- Rugged designs with continuous tracks
- Often use flexible materials for better traction
- Good for outdoor or uneven surfaces
Legged robots are the most complex:
- 4, 6, or 8 legs with multiple joints each
- Require careful design and control programming
- Can navigate terrain that wheels can't handle
Specialty Robots
Beyond arms and mobile bases, you can build:
- Walking robots – Bipeds, quadrupeds, hexapods
- Robotic grippers – Custom end effectors for specific tasks
- Educational platforms – Designed to teach specific concepts
- Art robots – Drawing machines, kinetic sculptures
- Competition robots – For events like Robot Wars or FIRST Robotics
How Do You Choose the Right Project?
The key to success is matching the project to your goals and skills.
Define Your Goals
For education:
- Choose simple, well-documented projects
- Focus on concepts rather than complexity
- A line-following robot teaches sensors, programming, and basic mechanics
For research:
- Define specific capabilities needed
- Consider modular designs for experimentation
- Document everything for reproducibility
For DIY fun:
- Follow your interests
- Combine robotics with other hobbies (art, cosplay, model-making)
- Don't be afraid to try something unique
Assess Your Skill Level
Beginner:
- Start with a kit or well-documented open-source design
- Use common components (Arduino, standard servos)
- Expect to learn as you go
Intermediate:
- Modify existing designs to add features
- Integrate multiple sensors
- Write custom control code
Advanced:
- Design everything from scratch
- Create custom electronics if needed
- Optimize for performance, weight, or cost
Consider Available Resources
- Printer capabilities – Build volume, material compatibility, precision
- Tools – Soldering iron, multimeter, hand tools
- Components – Motors, controllers, sensors, batteries
- Time – Complex projects can take months
- Budget – Materials are cheap, electronics add up
What Materials Work Best for Robot Parts?
Material choice affects strength, weight, durability, and print success.
Common Materials Compared
| Material | Strength | Flexibility | Print Difficulty | Best For |
|---|---|---|---|---|
| PLA | Moderate | Low | Easy | Prototypes, educational models, non-structural parts |
| ABS | High | Low | Moderate | Structural parts, components exposed to heat |
| PETG | High | Low | Easy | Strong parts, chemical resistance |
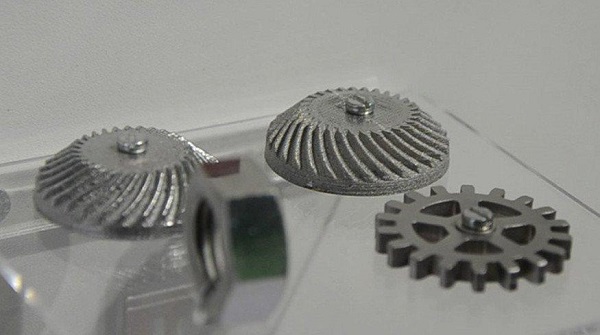
| Nylon | Very high | Moderate | Challenging | Gears, moving parts, high-stress components |
| TPU | Moderate | Very high | Moderate | Flexible joints, tires, bumpers |
| Carbon-fiber filled | Very high | Very low | Moderate | High-strength, lightweight structural parts |
How to Choose
For structural parts (chassis, arms, brackets):
- Use ABS, PETG, or nylon for strength
- Consider carbon-fiber filled for maximum stiffness
For moving parts (gears, joints):
- Nylon wears well and has low friction
- PETG works for less demanding applications
For flexible components (tires, soft grippers):
- TPU or other flexible filaments
For prototypes and testing:
- PLA is cheap, easy to print, and good enough for fit checks
Real example: A client building a walking hexapod used PLA for initial prototypes to test joint geometry. Once satisfied, they reprinted structural parts in carbon-fiber nylon for final assembly. The approach saved time and money.
What Electronics Do You Need?
The brain and muscles of your robot matter as much as the printed parts.
Microcontrollers and Single-Board Computers
| Controller | Best For | Pros | Cons |
|---|---|---|---|
| Arduino Uno/Nano | Simple robots, beginners | Easy to learn, huge community | Limited processing power |
| Raspberry Pi | Complex robots, vision, AI | Full computer, camera support | More complex, needs OS |
| ESP32 | IoT robots, wireless control | Built-in WiFi/Bluetooth, powerful | Power consumption higher |
| Teensy | High-performance robots | Very fast, good for complex control | Less beginner-friendly |
Motors and Actuators
What makes your robot move:
- DC motors – Simple, continuous rotation, need motor drivers
- Servo motors – Precise position control, ideal for arms and legs
- Stepper motors – Precise positioning, good for wheeled robots
- Linear actuators – Straight-line motion
Tip: Match motor torque and speed to your robot's requirements. Underpowered robots don't work. Overpowered ones waste battery and can damage parts.
Sensors
Sensors give your robot awareness:
- Ultrasonic – Distance measurement, obstacle detection
- Infrared – Line following, proximity
- LiDAR – 3D mapping (advanced)
- IMU – Orientation, acceleration
- Cameras – Vision, object recognition
- Encoders – Wheel position, speed
Power
Don't overlook power:
- Battery type – LiPo (high power, needs care), NiMH (safer, heavier), AA (simple, short life)
- Voltage regulation – Match component requirements
- Capacity – Calculate runtime needed
How Do You Design for 3D Printed Robots?
Good design makes assembly easier and robots more reliable.
Design for Printability
- Orient parts to minimize supports
- Add mounting features for electronics (screw bosses, slots)
- Design for tolerances – Moving parts need clearance (0.2-0.4mm typically)
- Consider layer lines – Parts are weakest between layers
Design for Assembly
- Modular design – Break complex robots into subassemblies
- Access panels – You'll need to reach electronics
- Wire management – Include channels or clips for cables
- Standard fasteners – Use common screw sizes
Design for Serviceability
Robots break. Make repairs easy:
- Replaceable parts – High-wear components should be easy to swap
- Accessible connectors – Don't bury wiring
- Documentation – Note what you did for future reference
Test Critical Features First
Before printing an entire robot:
- Print small test pieces for joints
- Verify electronics fit in designed mounts
- Check that motors have enough torque
- Test one leg before printing all six
Where Do You Find Designs and Inspiration?
You don't have to start from scratch.
Open-Source Platforms
- Thingiverse – Thousands of robot designs
- Printables – Growing collection of quality models
- GitHub – Complete projects with code and CAD
- Instructables – Step-by-step build guides
One well-known open-source project is the robotArm on GitHub. It provides 3D models, electronics schematics, and control code—everything needed to build your own robotic arm.
Online Communities
- Reddit (r/3Dprinting, r/robotics) – Advice and inspiration
- Discord servers – Real-time help from experienced builders
- Forums – Dedicated communities for specific robot types
Commercial Kits
For beginners, kits provide a structured introduction:
- All parts included
- Step-by-step instructions
- Proven designs that work
After building a kit, you'll understand enough to modify and create your own designs.
What Are Common Mistakes to Avoid?
Learn from others' failures.
Mistake 1: Overly Ambitious First Project
A walking humanoid robot with 20 servos is not a good beginner project.
Fix: Start simple. A wheeled robot with two motors teaches core concepts. Add complexity with each project.
Mistake 2: Ignoring Tolerances
Parts that don't fit together are useless.
Fix: Print test pieces for critical fits. Measure your printer's actual accuracy. Design with appropriate clearance.
Mistake 3: Poor Electronics Planning
Wires everywhere, connectors that don't match, insufficient power.
Fix: Plan the electronics before finalizing the design. Create a wiring diagram. Calculate power requirements. Include mounting for everything.
Mistake 4: Underestimating Post-Processing
Printed parts often need cleanup.
Fix: Budget time for support removal, sanding, and test fitting. Some parts may need reprinting with adjusted settings.
Mistake 5: Not Testing Incrementally
Printing an entire robot and hoping it works rarely succeeds.
Fix: Test subsystems individually. Test movement before adding sensors. Test code on one joint before all six.
How Do You Ensure Your Robot Actually Works?
A systematic approach increases success chances.
Step 1: Define Requirements
What should the robot do? How will you measure success?
Step 2: Design and Simulate
Use CAD to design parts. Some software can simulate basic movement.
Step 3: Prototype Critical Subsystems
Print one leg. Test one motor. Verify one sensor.
Step 4: Print and Test Incrementally
Build in stages. Test after each addition.
Step 5: Integrate and Debug
Combine subsystems. Expect problems. Fix them systematically.
Step 6: Iterate
First versions rarely work perfectly. Learn, modify, and try again.
What's the Best 3D Printer for Robot Projects?
The right printer depends on your needs.
Printer Options Compared
| Printer | Build Volume | Precision | Price | Best For |
|---|---|---|---|---|
| Ender 3 | 220×220×250mm | 0.1mm | Low | Beginners, small robots |
| Prusa i3 MK3S+ | 250×210×200mm | 0.05mm | Moderate | Quality prints, reliability |
| Bambu Lab X1 | 256×256×256mm | 0.05mm | Moderate-High | Fast prints, multi-material |
| Stratasys F900 | 914×610×914mm | 0.1mm | Industrial | Large, production robots |
For most robot projects, an Ender 3 or Prusa i3 is sufficient. The Ender 3 is budget-friendly and widely used. The Prusa offers better reliability and precision.
Printer Features That Matter
- Build volume – Can you print your largest part in one piece?
- Precision – Tighter tolerances need better printers
- Material compatibility – Can it print the materials you need?
- Reliability – Failed prints waste time and material
Conclusion
3D printed robot projects offer an incredible combination of creativity, engineering, and hands-on learning. Whether you're building a simple educational robot or a complex research platform, the principles are the same.
The key takeaways:
- Match the project to your goals and skills – Start simple, add complexity later
- Choose materials wisely – Match properties to part requirements
- Plan electronics carefully – Power, control, and sensors all need consideration
- Design for assembly and service – You'll thank yourself later
- Test incrementally – Catch problems early when they're easy to fix
- Learn from the community – Thousands of designs and experts are online
At Yigu Technology, we've seen 3D printed robotics transform how people learn and innovate. A well-designed robot project teaches design, electronics, programming, and problem-solving—all while creating something you can hold and show off.
The most important advice? Just start. Your first robot won't be perfect. Neither was anyone's. But each project builds skills for the next. And the satisfaction of watching something you designed and built come to life is worth every challenge.
Frequently Asked Questions
What is the best 3D printer for robot projects?
For most hobbyists, the Ender 3 or Prusa i3 MK3S+ are excellent choices. The Ender 3 is budget-friendly and widely used. The Prusa offers better precision and reliability. Choose based on your budget and requirements.
How can I improve the strength of 3D printed robot parts?
Use stronger materials like ABS, nylon, or carbon-fiber filled filaments. Optimize part orientation to align layers with stress directions. Add internal supports or lattice structures. Consider post-processing like annealing (for appropriate materials) or epoxy coatings.
Are there open-source 3D printed robot projects?
Yes, many. Platforms like GitHub, Thingiverse, and Printables host thousands of open-source robot designs. The "robotArm" project is a well-documented example with 3D models, electronics schematics, and control code available for free.
What electronics do I need for a basic robot?
At minimum: a microcontroller (Arduino is great for beginners), motors with drivers, a power source (battery), and perhaps sensors depending on your goals. Start simple and add complexity as you learn.
How long does a 3D printed robot project take?
Varies widely. A simple wheeled robot might take a weekend. A complex walking robot with custom design can take months. Plan for printing time (hours to days), assembly, programming, and troubleshooting.
Can I 3D print gears and moving parts?
Yes. Nylon works well for gears due to its wear resistance and low friction. PETG and ABS also work for less demanding applications. Design with appropriate clearances and test before final assembly.
Do I need to know programming?
For any robot that does more than sit there, yes. But beginner-friendly options exist—Arduino uses simplified C++, and some platforms use graphical programming (Scratch). Start with simple programs and build up.
What's the biggest mistake beginners make?
Starting with a project that's too complex. A walking humanoid robot with 20 servos will likely fail and discourage you. Start with a simple wheeled robot that works, then take on bigger challenges.
Contact Yigu Technology for Custom Manufacturing
Ready to bring your 3D printed robot project to life? At Yigu Technology, we combine years of manufacturing expertise with advanced 3D printing capabilities. Whether you need help optimizing designs, printing with specialized materials, or producing components at scale, our team delivers professional results. [Contact us today] to discuss your project—we'll help you build something amazing.