
Die Casting
What Is Die Casting of Small Batch Product Models and How to Master It?
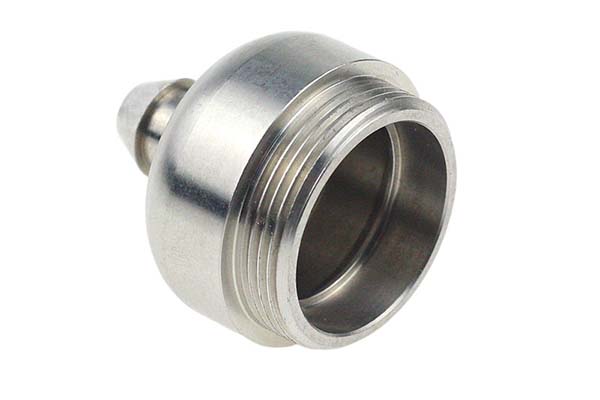
Die casting small batch product models is a critical stage in product development. It lets teams test designs, validate functions, and prepare for mass production before committing to expensive production tooling. But small batches come with unique challenges: tight lead times, cost-effective tooling needs, and strict cosmetic and dimensional demands. Traditional approaches designed for high volume don’t work.
Key takeaways
- The biggest hurdle in small batch die casting is often tooling. Traditional hard tools take too long and cost too much for short runs.
- The right alloy ensures your small batch models perform like the final product.
- Small batch models often have thin walls for lightweighting or high cosmetic standards for market testing.
- Small batches leave no room for trial and error. Low-volume process parameters must be precise to keep reject rates low.
How Do You Implement Rapid Tooling for Product Models?
The biggest hurdle in small batch die casting is often tooling. Traditional hard tools take too long and cost too much for short runs. Rapid tooling solves this by prioritizing speed and flexibility.
Key rapid tooling solutions
| Tooling Type | How It Works | Lead Time | Ideal Use Case |
|---|---|---|---|
| Soft-tool die casting | Uses epoxy or low-cost metals like aluminum instead of steel | 1-2 weeks | Initial design validation models |
| 3D-printed inserts | 3D prints complex inserts to fit standard mold bases | <1 week | Models with intricate internal features |
| Aluminum H13 hybrid molds | Combines aluminum (fast to machine) for non-critical areas with H13 steel (durable) for high-wear zones | 1.5-2.5 weeks | Models needing repeated runs up to 500 pieces |
| Bridge molds | Bridges prototype and production—works for small batches, modifiable for mass production | 2-3 weeks | Models likely to scale up soon |
Maximizing value
Use an insert exchange system: Swap out 3D-printed or soft-tool inserts for different model versions without rebuilding the entire mold. This cuts tooling costs by 40-60% for multi-variant small batches.
Calculate a cost amortization model: If a soft tool costs $2,000 and produces 200 models, tooling cost per unit is $10—far lower than hard tooling at $50+ per unit for small runs.
Aim for lead-time under 2 weeks to keep product development on track.
| Tooling Type | Lead Time | Cost per Unit (200 pcs) |
|---|---|---|
| Soft-tool | 1-2 weeks | $10 |
| 3D-printed inserts | <1 week | $8-12 depending on complexity |
| Aluminum H13 hybrid | 1.5-2.5 weeks | $15 |
| Bridge mold | 2-3 weeks | $20 |
| Traditional hard tool | 4-6 weeks | $50+ |
How Do You Select and Validate Alloys for Models?
The right alloy ensures your small batch models perform like the final product. Selection depends on the model’s purpose—structural parts need strength, cosmetic parts prioritize finish.
Common alloys for small batch product models
| Alloy | Key Properties | Ideal Application |
|---|---|---|
| A380.1 | High strength, good machinability, excellent castability | Structural models—automotive brackets |
| ADC12 | Low cost, good surface finish, high fluidity | Cosmetic models—electronic housings |
| Zamak 5 | High precision, good corrosion resistance, low melting point | Small, detailed models—hardware components |
| AZ91D | Lightweight (30% lighter than aluminum), high strength-to-weight | Lightweight models—drone parts |
Validation is non-negotiable
For each batch:
- Cast mechanical coupons —small test pieces—to run tensile validation (tests strength) and thermal cycling (tests durability in temperature changes)
- Do a salt-spray corrosion test —48 hours for Zamak 5—to check rust resistance
- Provide an alloy equivalency chart and certificate of compliance —critical for automotive or aerospace clients
If a client specifies “A380.1 equivalent,” the chart proves your alloy meets the same standards.
How Do You Master Thin-Wall and Cosmetic Casting Control?
Small batch models often have thin walls for lightweighting or high cosmetic standards for market testing. Thin-wall and cosmetic casting control prevents defects like cold laps or blemishes.
Tips for thin-wall casting under 0.5mm
Monitor flow-front temperature: Use sensors to ensure molten alloy stays hot enough—650-680°C for ADC12 —as it fills thin walls. Too cool and it solidifies early, leaving gaps.
Design venting channels: Place small vents at 0.2-0.3mm wide at the end of thin walls to let air escape. Without vents, air gets trapped, causing holes.
Use vacuum level under 50 mbar: A strong vacuum removes air from the mold, improving alloy flow into thin sections.
Cosmetic control for Grade A models
Create a surface blemish map: Mark areas where blemishes—scratches, pits—are acceptable (hidden inside) and where they’re not (front faces).
Prevent cold laps: Cold laps happen when two alloy streams meet but don’t fuse. Fix by increasing die temperature to 200°C instead of 180°C or raising fast-shot speed.
Test finish: For painted models, do a paint adhesion tape test —paint shouldn’t peel. Check gloss 60° value —≥80 for high-gloss finish. Limit orange-peel (uneven texture) to visual rating ≤2 on 1-5 scale.
| Parameter | Target Range | Why It Matters |
|---|---|---|
| Flow-front temp | 650-680°C (ADC12) | Prevents early solidification |
| Vent width | 0.2-0.3mm | Lets air escape from thin walls |
| Vacuum level | <50 mbar | Improves flow into thin sections |
| Die temp | 200°C | Prevents cold laps |
| Gloss 60° | ≥80 | High-gloss finish |
What Low-Volume Process Parameters Ensure Consistency?
Small batches leave no room for trial and error. Low-volume process parameters must be precise to keep reject rates low.
Critical parameters to control
| Parameter | Target Range | Why It Matters |
|---|---|---|
| Shot weight | ≤2 kg | Small batches use less material—overshooting wastes alloy |
| Slow-shot speed | 0.3 m/s | Fills runner smoothly; fast speed causes turbulence |
| Fast-shot switch point | 80-90% mold fill | Switches to fast speed to fill cavity before alloy solidifies |
| Intensification pressure | 600 bar | Presses alloy into details; too low causes porosity |
| Die temperature window | 180-220°C | Consistent temp prevents warping or cold laps |
| Cycle time | 45 seconds | Balances speed and quality—faster skips cooling, slower wastes time |
Other tips
Use plunger tip coating like tungsten carbide to reduce wear—critical for consistent shot weight.
Ensure ladling accuracy at ±2%: Use an automatic ladle to measure alloy. Manual ladling leads to inconsistent amounts.
Aim for reject rate under 3%: Track rejects daily. If it climbs to 5%, check parameters—is die temperature dropping?
What Post-Casting Finishing Processes Polish Models to Perfection?
Small batch models need finishing to look and function like final products. Post-casting finishing steps depend on the model’s use case.
Common finishing processes
| Process | Purpose | Ideal For |
|---|---|---|
| Gate micro-milling | Removes gate marks with precision | Models with visible edges—phone cases |
| Robotic deburring | Removes burrs from hard-to-reach areas | Complex models—gear housings |
| Vibratory polish | Smooths surfaces with ceramic media | Models needing matte finish |
| Anodize type II | Adds thin, colored oxide layer—black, silver | Aluminum models needing corrosion resistance and color |
| E-coat primer | Applies even, protective base coat | Models that will be painted later |
For cosmetic models
Use satin shot-blast for a uniform, soft finish.
Do silk-screen mask for logos or labels. Ensure color match ΔE <1.0 —ΔE measures color difference; under 1.0 means human eye can’t tell the difference.
How Do You Perform Dimensional and Functional Verification?
The final step confirms your small batch models meet design specs. Dimensional and functional verification ensures no surprises for clients.
Dimensional checks
CT porosity scan: Creates 3D image to find internal defects—small pores—that X-rays miss.
CMM datum alignment: Measure critical dimensions like hole spacing. Aim for GD&T profile 0.1mm —a tight tolerance for small models.
Optical 3D scan: Compare model to CAD design—fast and accurate for complex shapes.
Functional checks
Assembly fit check: Test if model fits with other parts—does a lid close on a housing?
Screw-boss torque test: Ensure screw bosses handle required torque—5 N·m for plastic screws.
Leak-down test: For models holding fluids like pumps, test at 50 kPa —no air should leak.
Document everything
Create an SPC batch chart to track dimensions across the batch—hole diameter for each model.
Do a first-article inspection (FAI) on the first model—sign off before running the rest.
Provide PPAP level 2 documentation for automotive industries—includes FAI reports, CAD comparisons, material certificates.
| Verification | Method | Target |
|---|---|---|
| Internal defects | CT porosity scan | No pores >0.1mm |
| Critical dimensions | CMM with GD&T | Profile ≤0.1mm |
| Shape comparison | Optical 3D scan | Within CAD tolerance |
| Assembly fit | Physical test | Parts mate correctly |
| Screw boss strength | Torque test | 5 N·m minimum |
| Leak testing | Pressure at 50 kPa | Zero leakage |
How to write a spec that gets priced correctly
A drawing is a contract. If it leaves a number open, the shop fills that number in with its own default. The default is rarely the one you had in mind. Put these five lines on every RFQ and most of the back-and-forth disappears before it starts.
- 3D model with the parting line marked
- Alloy grade and the standard it meets
- Wall thickness and draft on every face
- Machining allowance on the faces that will be cut
- Pressure tightness or porosity class
The point is not paperwork. Each line removes a decision the shop would otherwise make for you. A complete RFQ comes back priced. An incomplete one comes back guessed.
What actually drives the price
Buyers usually push on material because it is the line they can see. In practice the material is rarely the biggest number on a quote. These five lines decide most of it:
- die steel and cavity count
- part weight and wall section
- draft and slide count
- porosity requirement
- machining allowance
Ask for the quote split by line. A supplier who cannot break it down is guessing, and you will pay for the guess. The line you can usually renegotiate is the tolerance band, not the raw material.
Problems you will meet, and the fix
Every process has a failure mode it prefers. The same four show up again and again on this kind of work, and none of them are mysteries once you know what to look for.
- Cold shuts where two flow fronts meet
- Porosity that shows up only after machining
- Soldering on a hot spot in the die
- Shrinkage voids in a heavy section
Catch the fault on the first part, not the hundredth. A first-article check costs an hour. A bad batch costs the whole order. Write the check into the purchase order so nobody has to remember it.
What to check on the first article
The first article is the cheapest inspection you will ever buy. Use it properly and the rest of the run becomes boring, which is exactly what you want.
- Every dimension on the drawing, with the measured value written beside it.
- The material certificate, matched to the heat or lot number on the parts.
- The finish against the sample you approved, under the same light.
- Fit against the mating part, assembled rather than measured.
- Packaging, because parts that arrive damaged were never in tolerance.
Check in this order: datums, then mating features, then cosmetic faces. If the datums are wrong, every number after them is noise. Keep the report on file. When a problem shows up in month six, that document is the only thing that tells you what changed.
How to compare two quotes fairly
Two numbers are not comparable unless the scope matches. Line them up before you decide, because a low number with three gaps is not a low number.
Same drawing, same material, same finish, same inspection. Anything else is a different job wearing the same part number. Then look at what each quote leaves out. Freight, packaging, certificates and tooling are the usual gaps.
Ask each supplier to state their assumptions in writing. The one who does is usually the one who has run the process before.
Scaling from one part to a batch
The first part teaches you the process. The hundredth teaches you the process cost.
Watch three things as volume grows: setup amortisation, tool wear, and how much hand work the finish still needs. If the unit price barely moves between ten and a hundred, the cost sits in material or in hand work, not in setup. Ask which, because only one of them is negotiable.
Lead time behaves the same way. A one-off is scheduled around other jobs. A repeat order is scheduled around your forecast. Give the shop a forecast and the lead time gets shorter, not longer.
How to read a supplier's quote
A quote is a short document with a long shadow. Four things in it decide whether the job runs smoothly, and only one of them is the price.
- The scope line. It should name the process, the material and the finish, not just the part.
- The tolerance basis. General tolerance or the drawing, and which standard it follows.
- The exclusions. Tooling, freight, certificates and inspection are the usual omissions.
- The validity date. Material prices move, and an open-ended quote is a promise nobody can keep.
Read the exclusions before you read the total. A quote that leaves out tooling is not cheaper. It is a quote for a different job.
Industry Experience: Small Batch Models in Action
A consumer electronics company needed 50 phone frame prototypes with 0.6mm walls and high-gloss finish. Traditional tooling would take 6 weeks at $25,000. Using 3D-printed inserts in a standard mold base, they had first parts in 10 days at $8,000. CT scan revealed no internal porosity. Gloss testing showed 85 at 60°. Design validated, production tooling ordered.
An automotive supplier needed 200 bracket prototypes for crash testing. Requirements: A380.1 alloy, tensile strength >300 MPa, GD&T profile 0.1mm. Aluminum H13 hybrid mold delivered in 2 weeks at $12,000. Mechanical coupons tested at 320 MPa. CMM inspection passed all dimensions. Crash tests successful.
A drone manufacturer needed 100 lightweight motor mounts in AZ91D magnesium. Thin walls at 0.8mm. Soft-tool die casting with vacuum assist produced parts in 2 weeks. CT scan showed no porosity in thin sections. Weight saved 30% versus aluminum. Flight tests confirmed performance.
Die casting small batch product models requires balancing speed, quality, and cost with strategies different from high-volume production. Rapid tooling—soft-tool, 3D-printed inserts, aluminum H13 hybrids, bridge molds—cuts lead time to 1-2.5 weeks and tooling cost per unit to $10-20. Alloy selection matches model purpose—A380.1 for strength, ADC12 for cosmetics, Zamak 5 for precision, AZ91D for light weight. Thin-wall control with flow-front monitoring, venting, and vacuum prevents defects. Cosmetic control with blemish maps, temperature tuning, and finish testing achieves Grade A surfaces. Process parameters—shot weight, speeds, pressure, temperature—must be precise to keep reject rates under 3%. Finishing—micro-milling, deburring, polishing, anodizing, coating—delivers final appearance. Verification with CT scan, CMM, functional tests, and full documentation proves models work. When executed correctly, small batch die casting delivers high-quality models rapidly, enabling confident progression to mass production.
Our solution for Die Casting
YiguProto runs die casting in house, from a single prototype to a production batch. We quote the process, the material and the finish as separate lines, so you can see where the money goes instead of arguing with one number.
Send a STEP file or a drawing and you get a DFM report in one to two business days. It flags the features that add cost and the features that will not hold tolerance on the process you picked.
Every order ships with an inspection report on the features you call out. If a part misses, we make it again. Ready to price a part? Start with a free quote and DFM review, or read more about our die casting. You can also talk to an engineer before you commit to a drawing.
FAQ about Die Casting
Is there a minimum order quantity?
No hard minimum. One part is fine. What changes with volume is which costs dominate, so a single unit is priced mostly on setup and a thousand units are priced mostly on cycle time and material.
What files do you need in order to quote?
A STEP file plus a PDF drawing that carries the same revision letter. The model carries the geometry and the drawing carries the intent. When the two disagree, the shop picks one, and it is never the one you meant.
What is Die Casting used for?
Die Casting turns up wherever the part has to do a real job at a predictable cost: brackets, housings, fixtures, covers and the fittings that hold them together. The honest test is whether the properties match the load and the environment, not whether the material is fashionable.
Can Die Casting be made in small quantities?
Yes, and small quantities are where a good supplier earns the next order. Setup dominates the price at low volume, so the cheapest route is usually the one with the fewest operations, not the cheapest material.
What tolerance can you hold on Die Casting?
The working default is ±0.1 mm on cast features, ±0.05 mm after machining. Tighter than that the process changes and so does the price, because every step tighter adds inspection time. Call out only the faces that mate with something else and leave the rest on the general tolerance.
Does the process work for prototypes as well as production?
Yes, and that is usually the point. Running the prototype on the production process removes a whole class of surprises, because the part you test is made the same way as the part you sell.
The short version
Die Casting rewards the buyer who reads the data sheet and the drawing together. Pick the option for the property that matters, not for the price per kilo.
Tighten only what mates. Test a sample before the run. Then let the process do the rest.