
Surface Treatment
What Is Post-Machining and Why Is It Critical for Precision Parts?
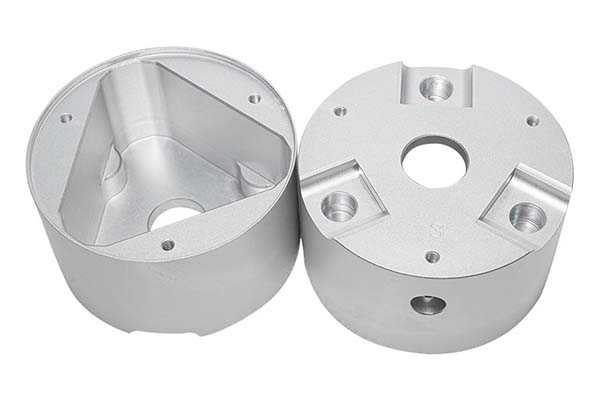
In precision manufacturing, the difference between a good part and a great part often comes down to the final steps. You have machined your component. It has the right shape. But is it ready to perform? This is where post-machining becomes essential. It refers to the series of processes performed after primary machining—like CNC cutting, stamping, or 3D printing—to get the part ready for its real-world job.
Key takeaways
- To understand its value, we first need a clear definition of what post-machining is and what it aims to achieve.
- Choosing the right post-machining process depends on your part’s material, its function, and your budget.
- The material your part is made from dictates what post-machining processes are possible—and which ones to avoid.
- Ensuring post-machining is done right requires a robust quality control system. This involves checking specific parameters with the right tools.
What Exactly Is Post-Machining?
To understand its value, we first need a clear definition of what post-machining is and what it aims to achieve.
Defining the Scope of Post-Machining
Post-machining encompasses all the secondary operations applied to a part after the main shaping process is complete. Its goal is to fulfill the part’s final performance requirements. This is not just about making a part look better. It is a critical manufacturing stage that uses physical, chemical, or mechanical methods to fix machining flaws, boost surface performance, and lock in precise dimensions.
Think of it as the bridge between a semi-finished product and a finished one. For example, a CNC machined aluminum housing might have perfect dimensions but a rough surface finish. That roughness could cause friction or poor sealing in its final application. Post-machining, through processes like polishing or anodizing, corrects this, ensuring the part functions exactly as intended.
The Three Core Categories of Post-Machining
Post-machining is a broad field, but most processes fall into one of three main categories. These categories often work together in a sequence to achieve the final result.
- Surface Treatment Processes: These address corrosion, wear resistance, and aesthetics. Common examples include electroplating, painting, and anodizing.
- Precision Improvement Technologies: These correct minor machining inaccuracies and ensure tight tolerances. This includes fine grinding, polishing, and laser correction.
- Final Finishing Operations: These prepare the part for assembly or use. This covers deburring, laser marking, and ultrasonic cleaning.
A real-world case: A manufacturer produces stainless steel surgical tools. After CNC machining, the tools go through a specific post-machining sequence: deburring to remove sharp edges, ultrasonic cleaning to remove all residues, passivation to enhance corrosion resistance, and finally laser marking to add serial numbers. This complete process ensures the tools are safe, durable, and traceable, meeting strict medical standards.
What Are the Key Post-Machining Technologies?
Choosing the right post-machining process depends on your part’s material, its function, and your budget. Here is a detailed look at seven core technologies, including how they work and when to use them.
Deburring: Eliminating Hidden Defects
Machining operations like milling and drilling often leave small, raised edges on parts called burrs. These burrs are more than just cosmetic flaws. They can interfere with assembly, cause stress points that lead to cracks, or scratch mating surfaces during operation. Removing them is a fundamental post-machining step.
| Technology | How It Works | Best For | Key Trade-Offs |
|---|---|---|---|
| Manual Deburring | Skilled workers use hand tools like files and scrapers. | Small batches, complex or delicate parts. | Pros: Flexible, low tooling cost. Cons: Slow, inconsistent quality. |
| Mechanical Deburring | Parts are processed in bulk with abrasives, tumbling media, or brushes. | High volumes of simple, sturdy parts. | Pros: Fast, consistent. Cons: Can damage delicate features. |
| Thermal Deburring | Parts are exposed to a high-energy gas flash that burns off burrs. | Parts with hard-to-reach internal burrs. | Pros: Reaches every surface. Cons: High equipment cost. |
| Laser Deburring | A focused laser beam melts and vaporizes the burr. | High-precision, micro-sized parts. | Pros: Non-contact, extremely precise. Cons: Highest cost, slower cycle time. |
Industry Case: A manufacturer of precision gears switched from manual to laser deburring. The result was a burr removal rate of 99%, a process 15 times faster than manual work, and a jump in product yield from 89% to 98.5% by eliminating the surface damage caused by mechanical methods.
Polishing: Improving Surface Quality
Polishing aims to reduce a part’s surface roughness. A smoother surface can reduce friction, improve sealing, and enhance appearance. Polishing is often done in stages, moving from coarse to fine abrasives.
- Rough Polishing: Uses grinding wheels or coarse compounds to remove heavy tool marks. Achieves a roughness of Ra 0.8-1.6 μm.
- Medium Polishing: Uses finer compounds and cloth wheels to create a uniform, satin finish. Achieves Ra 0.2-0.8 μm.
- Fine Polishing: Uses diamond compounds and soft wheels to create a mirror-like finish. Achieves Ra less than 0.2 μm for critical applications like optics or molds.
Practical Tip: When fine polishing stainless steel, control is key. Using a cloth wheel speed of 1500-2000 RPM with a W5 diamond paste helps achieve a high-gloss finish without overheating and damaging the surface.
Heat Treatment: Enhancing Material Properties
Heat treatment uses controlled heating and cooling cycles to change a metal’s internal structure. This alters its mechanical properties like hardness, strength, and toughness. It is a powerful tool for getting the best performance from a material.
- Quenching: Heating steel above a critical temperature and then cooling it rapidly (in oil or water). This greatly increases hardness and wear resistance. It is essential for gears and cutting tools.
- Tempering: Always performed after quenching. It reheats the part to a lower temperature. This reduces brittleness caused by quenching, creating a tough part that can resist impacts.
- Annealing: Heating and then cooling slowly. This softens the material, making it easier to machine or form in subsequent steps.
Data Point: According to ISO 683-15 standards, a common 1045 steel part, when quenched from 850°C and tempered at 200°C, can achieve a hardness of HRC 55-60 and a tensile strength over 1200 MPa. This is more than a 40% improvement over its untreated state.
Electroplating vs. Electroless Plating: Surface Protection
Both methods apply a thin metal coating to a part’s surface, but they work differently and have distinct advantages.
- Electroplating: Uses an electric current to deposit a metal coating (like zinc, chrome, or nickel). It creates a uniform, tightly bonded layer, typically 5-50 μm thick. It is widely used for corrosion protection (galvanizing) and wear resistance (hard chrome).
- Electroless Plating: Uses a chemical reaction to deposit the coating, requiring no electricity. This allows it to coat complex shapes and internal passages uniformly. Electroless nickel coatings, for example, offer excellent corrosion resistance.
Application Example: Automotive chassis bolts are often electroplated with zinc. A 8-12 μm coating can withstand a salt spray test for over 720 hours. In contrast, electronic connectors might use electroless silver plating for its superior conductivity and uniform coverage on tiny features.
Spraying and Coating: Multi-Functional Layers
Spraying applies a layer of paint, powder, or other material to a part’s surface. It is versatile and can be used for protection, decoration, or special functions.
- Powder Coating: An environmentally friendly, solvent-free process. It creates a thick (60-150 μm), durable finish ideal for outdoor equipment and appliances.
- Electrophoretic Coating (E-coat): The part is dipped in a bath and a charge attracts the paint. It provides excellent corrosion resistance on complex shapes, like car bodies.
- Nano-coatings: These are ultra-thin layers (1-10 μm) that impart special properties. For example, a ceramic nano-coating on a cutting tool can make it heat-resistant and self-lubricating.
Innovative Case: An aerospace company applied a ceramic nano-coating to turbine blades. The 5 μm coating allows the blades to withstand operating temperatures up to 1200°C, tripling the lifespan compared to traditional coatings and significantly reducing maintenance costs.
Laser Marking: Creating Permanent Marks
Laser marking uses a focused beam of light to create permanent marks on a part’s surface. It is the go-to method for adding traceability and branding.
- Advantages: It is incredibly precise (marks as small as 0.1mm), non-contact (no tool wear), and creates permanent, high-contrast marks that resist wear, heat, and chemicals.
- Common Uses: Adding serial numbers, barcodes, QR codes, and logos. It is essential in medical devices for UDI compliance and in aerospace for part traceability.
Ultrasonic Cleaning: Achieving Microscopic Cleanliness
Ultrasonic cleaning uses high-frequency sound waves (20-80 kHz) in a liquid to create microscopic bubbles. These bubbles implode, creating a scrubbing action that dislodges dirt, oil, and debris from every surface, including blind holes and crevices.
- Ideal for: Cleaning precision parts like bearings and injectors after machining, removing resin from 3D-printed parts, and cleaning electronic assemblies.
- Typical parameters: A cleaning bath temperature of 50-60°C with a cycle time of 3-10 minutes is often 5-10 times more effective than simple immersion.
How Do Material Choices Affect Post-Machining?
The material your part is made from dictates what post-machining processes are possible—and which ones to avoid. Using the wrong process can ruin a part.
Post-Machining for Metals
- Aluminum Alloys: Lightweight but soft and prone to oxidation. Common processes are anodizing (to create a hard, protective, and colorable surface) and sandblasting (for a matte finish). Precaution: The surface must be perfectly clean before anodizing, or the coating will fail.
- Stainless Steel: Known for corrosion resistance but can be scratched. Common processes are passivation (to enhance its natural corrosion layer), fine polishing (for a clean, smooth finish), and electroplating (for decorative effects). Case: A cookware maker uses passivation followed by a brushed finish on its stainless steel pots. The result passes a 1000-hour salt spray test and meets food safety standards.
Post-Machining for Plastics
Plastics are soft and heat-sensitive. Post-machining must avoid high temperatures and pressures.
- Common processes: Painting for color, UV-cured coatings for scratch resistance, hand polishing for clarity, and CO2 laser marking for permanent labels.
- Common problem: Paint sagging or bubbling. Solution: Clean parts thoroughly before painting, apply thin coats (10-20 μm per layer), and use low-temperature curing (60-80°C).
Post-Machining for High-Temperature Materials
Materials like titanium alloys and superalloys are used in extreme environments (jet engines, rockets). Their post-machining is specialized.
- Common processes: Vacuum heat treatment (to prevent oxidation at high temperatures), thermal spray coatings (like ceramic barriers), and chemical vapor deposition (CVD).
- Data Point: A titanium alloy component, after vacuum quenching at 950°C and receiving a thermal spray coating, can have its service life at 600°C more than doubled compared to an untreated part.
How Is Post-Machining Quality Controlled?
Ensuring post-machining is done right requires a robust quality control system. This involves checking specific parameters with the right tools.
Key Quality Parameters
- Surface Roughness (Ra): A measure of the surface’s smoothness. It is critical for parts that slide against each other or need a good seal.
- Dimensional Accuracy: Verifies that the part still meets its design tolerances after post-processing.
- Coating Performance: For coated parts, you must check thickness, adhesion, and corrosion resistance.
Common Inspection Methods
| Inspection Target | Common Method | Typical Equipment | Relevant Standard |
|---|---|---|---|
| Surface Roughness | Stylus profilometer | Roughness Tester | ISO 1997, GB/T 1031 |
| Dimensional Accuracy | Coordinate Measuring Machine (CMM) | CMM, Optical Comparator | ISO 10360 |
| Coating Thickness | Magnetic Induction, Eddy Current | Coating Thickness Gauge | ISO 2178, ASTM B499 |
| Corrosion Resistance | Salt Spray Test | Salt Spray Chamber | ASTM B117, ISO 9227 |
| Internal Defects | Ultrasonic Testing | Ultrasonic Flaw Detector | ISO 9712 |
Practical Case: A precision mold shop uses a CMM to inspect mold cavities after post-machining. With an accuracy of ±0.001mm, the automated system is three times faster than manual checks and has reduced inspection errors by 80%.
Where Is Post-Machining Applied?
Post-machining is not a niche process; it is fundamental to nearly every advanced manufacturing industry.
- Aerospace: Post-machining ensures engine blades can withstand 1500°C and structural parts meet tight tolerances. Processes like vacuum heat treatment, laser correction, and nano-coatings are common.
- Automotive: From brake discs to body panels, post-machining balances performance and cost. Quenching, E-coating, and fine grinding are essential for durability and appearance.
- Medical Devices: Focus is on sterility and biocompatibility. Ultrasonic cleaning, passivation, and laser marking are critical steps for tools and implants.
- Mold Making: The quality of the mold determines the quality of the parts it produces. Polishing, nitriding, and texturing create durable, high-precision mold surfaces.
How to write a spec that gets priced correctly
A drawing is a contract. If it leaves a number open, the shop fills that number in with its own default. The default is rarely the one you had in mind. Put these five lines on every RFQ and most of the back-and-forth disappears before it starts.
- The finish by its standard, not by a colour name
- Which faces are cosmetic and which are functional
- Masking: threads, bores, electrical contacts
- Colour target and the light it will be judged under
- Any salt spray or adhesion test required
The point is not paperwork. Each line removes a decision the shop would otherwise make for you. A complete RFQ comes back priced. An incomplete one comes back guessed.
What actually drives the price
Buyers usually push on material because it is the line they can see. In practice the material is rarely the biggest number on a quote. These five lines decide most of it:
- finish type and specification
- surface area
- masking complexity
- colour matching
- rework risk
Ask for the quote split by line. A supplier who cannot break it down is guessing, and you will pay for the guess. The line you can usually renegotiate is the tolerance band, not the raw material.
FAQ: Post-Machining
What is the typical cost of post-machining as a percentage of total part cost?
It varies widely by industry. For simple, high-volume parts like standard fasteners, it might be 10-15%. For complex, high-precision parts like medical implants or aerospace blades, where multiple critical steps are required, it can exceed 40%.
How can I prevent post-machining processes from warping my parts?
The key is matching the process to the material and part geometry. For heat-sensitive materials like plastics, avoid high-temperature processes. For thin-walled parts, use non-contact methods like laser processing where possible. Always follow heat treatment with a stress-relieving step like tempering, and control machining parameters to avoid local overheating.
How do I ensure traceability for my post-machined parts?
A robust system has three parts: first, apply a permanent mark like a laser-engraved Data Matrix code to each part. Second, link that code to a digital record containing all process parameters and inspection results. Third, use batch management to group parts processed under identical conditions for simplified record-keeping.
How we can help
YiguProto runs surface finishing in house, from a single prototype to a production batch. We quote the process, the material and the finish as separate lines, so you can see where the money goes instead of arguing with one number.
Send a STEP file or a drawing and you get a DFM report in one to two business days. It flags the features that add cost and the features that will not hold tolerance on the process you picked.
Every order ships with an inspection report on the features you call out. If a part misses, we make it again. Ready to price a part? Start with a free quote and DFM review, or read more about our surface finishing. You can also talk to an engineer before you commit to a drawing.
Frequently asked questions
How do I compare two quotes fairly?
Match the scope first: same drawing, same material, same finish, same inspection. Then read the exclusions. Freight, tooling and certificates are the usual gaps, and a low number with three gaps is not a low number.
How long does a first article take?
Usually a few business days once the drawing is frozen, and longer if tooling is involved. The date we give you is the date we confirm in writing, not the date we hope for.
Is there a minimum order quantity?
No hard minimum. One part is fine. What changes with volume is which costs dominate, so a single unit is priced mostly on setup and a thousand units are priced mostly on cycle time and material.
What happens if a part is out of specification?
We measure it against the same drawing you approved and, if it misses, we make it again. What matters is that the report exists, because a disagreement without data is just an opinion.
Does the process work for prototypes as well as production?
Yes, and that is usually the point. Running the prototype on the production process removes a whole class of surprises, because the part you test is made the same way as the part you sell.
What material should I specify?
Specify by standard, not by trade name. A trade name can change under you between two orders; a standard number cannot. Then add the one property that actually decides the part, whether that is strength, heat resistance or chemical exposure.
The short version
Good parts reward the buyer who reads the data sheet and the drawing together. Pick the option for the property that matters, not for the price per kilo.
Tighten only what mates. Test a sample before the run. Then let the process do the rest.