
Die Casting
What Are Key Steps and Solutions for Aluminum Shell Die Casting?
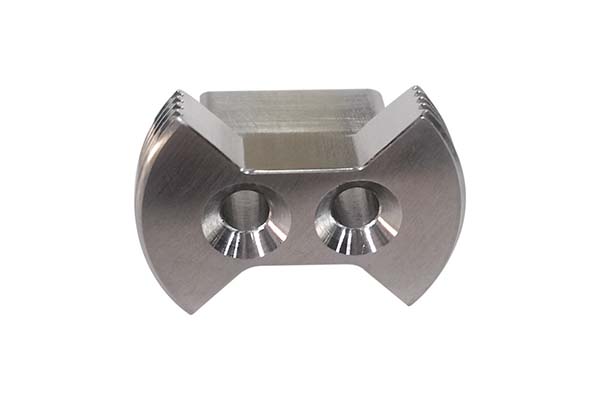
If you manufacture aluminum shells—for phones, laptops, EV battery enclosures, or industrial equipment—you know the challenges. These parts need to be thin, light, and strong. They must look good and perform reliably. A tiny defect like porosity can ruin waterproofing. A slight warp can prevent assembly.
Key takeaways
- Your choice of alloy determines how your shell performs. Different applications need different properties.
- Mold design makes or breaks aluminum shell die casting. Thin walls (0.8–2mm) and complex features create high risks.
- Thin shells need tighter control than solid parts. Small deviations cause big defects.
- Even with good design, defects happen. Here are the most common problems and their solutions.
What Aluminum Alloys Work Best for Different Shells?
Your choice of alloy determines how your shell performs. Different applications need different properties.
| Alloy | Key Properties | Best Applications | Selection Tips |
|---|---|---|---|
| ADC12 | Good castability, moderate strength (310MPa), low cost | Consumer electronics: phone frames, laptop palm rests | Avoid for outdoor or cold-weather use—ADC12 gets brittle below -10°C |
| A380 | High ductility (8% elongation), excellent corrosion resistance | Automotive: EV charging port housings, sensor enclosures | Perfect for shells exposed to moisture or road salt |
| A356 | High strength (320MPa after heat treatment), heat resistant up to 250°C | High-performance: EV battery covers, LED driver housings | Required for shells that must dissipate heat |
| AlSi10MgMn | Ultra-low porosity, high weldability, lightweight (2.68g/cm³) | Aerospace, medical: drone casings, portable MRI enclosures | Choose when post-casting welding is needed |
When You Need Multiple Properties
Some shells need a balance. A phone case must be thin (ADC12 is good) but also drop-resistant (A380 is better). In these cases, consider alloy blending:
- Mix 80% ADC12 + 20% A380
- Test at least 50 prototypes
- Verify impact resistance: must survive 1.5m drops onto concrete
How Do You Design Molds for Thin-Walled Shells?
Mold design makes or breaks aluminum shell die casting. Thin walls (0.8–2mm) and complex features create high risks.
Wall Thickness and Rib Design
Keep thickness uniform: Variations over 0.3mm cause uneven cooling and warping. If a 1mm shell needs a thicker boss, use a gradual transition with a 3mm radius.
Use ribs for strength:
- Rib height ≤ 5× wall thickness (5mm ribs for 1mm walls)
- Rib width = 0.6–0.8× wall thickness
- Rib corners: radius ≥ 0.5mm to reduce stress
Runner and Gate Design
The runner system must deliver metal smoothly—turbulence causes porosity.
| Component | Design Rule | Why |
|---|---|---|
| Inner gate | Fan-shaped, width 3–5× wall thickness | Spreads metal evenly |
| Gate position | At thickest area (e.g., 2mm edge) | Prevents early freezing |
| Runner | Diameter = √(shell weight in grams), curved path (no sharp turns) | Reduces turbulence |
| Relief groove | Volume = 1.2× shell volume, at last-filling area | Catches trapped gas and excess metal |
Cooling System Design
Uniform cooling: Place water channels 5–8mm from the cavity surface. For a 100×50mm shell, use 4 channels spaced 25mm apart.
Localized cooling: For thick bosses, use copper inserts (high thermal conductivity). This cuts cooling time by 30% and prevents shrinkage.
What Process Parameters Produce Quality Shells?
Thin shells need tighter control than solid parts. Small deviations cause big defects.
Pre-Injection Setup
Mold temperature: Heat to 200–230°C (10–20°C higher than for solid parts). Use sensors 3mm from the cavity. Keep fluctuations under ±5°C.
Metal treatment:
- Degas with argon for 10–15 minutes (hydrogen below 0.15ml/100g Al)
- Filter through 50μm ceramic to remove oxides
Injection Parameters
Two-stage injection speed:
- Slow stage: 1–2 m/s (fills runner without splashing)
- Fast stage: 3–4 m/s (fills thin cavity before freezing)
- Avoid over 4.5 m/s—turbulence creates pinholes
Injection pressure: 80–120MPa (higher than solid parts to fill narrow gaps)
Holding time: 5–8 seconds (shorter than solid parts to avoid over-pressurization)
Cooling and Ejection
Cooling time: 10–15 seconds for 1mm walls. Add 2 seconds for every 0.2mm thickness increase.
Ejection: Use 8–12 ejector pins spaced evenly. Pin diameter = 2–3× wall thickness (2mm pins for 1mm walls).
What Defects Appear in Aluminum Shells and How Do You Fix Them?
Even with good design, defects happen. Here are the most common problems and their solutions.
Cold Shuts (Seam Lines)
What they look like: Visible lines where metal streams met but did not fuse.
Causes:
- Injection speed too slow (under 3 m/s in fast stage)
- Mold too cold (under 190°C)
- Wall too thin (under 0.8mm) with no relief groove
Solutions:
- Increase fast-stage speed to 3.5–4 m/s
- Raise mold temperature to 220–230°C
- Add 0.5mm deep relief groove at the cold shut location
Surface Pinholes
What they look like: Tiny holes on the surface, often invisible until machining.
Causes:
- Poor degassing (hydrogen over 0.2ml/100g Al)
- Turbulent flow from sharp runner turns
- Moisture in raw materials (over 0.1%)
Solutions:
- Extend argon degassing to 18–20 minutes; verify with hydrogen analyzer
- Replace sharp turns with 5mm radius curves
- Dry materials at 120–150°C for 6 hours
Warpage (Twisted Shells)
What it looks like: The shell does not lie flat or fit assembly.
Causes:
- Uneven cooling (water channels too far from cavity)
- Asymmetric design (ribs on one side, smooth on the other)
- Uneven ejection force
Solutions:
- Move water channels to 5mm from cavity; add copper inserts under ribbed areas
- Add balancing ribs to the smooth side
- Adjust ejector pins to achieve even force (±5N)
Undercasting (Incomplete Filling)
What it looks like: Missing material, usually at thin features far from the gate.
Causes:
- Inner gate too narrow (width under 3× wall thickness)
- Metal too cold (under 670°C for ADC12)
- Relief groove blocked by oxides
Solutions:
- Widen inner gate to 4× wall thickness
- Increase metal temperature to 690–700°C
- Add second 50μm filter before relief groove; clean groove every 100 shots
Real-world example: A phone case manufacturer had 15% scrap from undercasting in a 0.8mm snap-fit groove. They widened the gate from 2.4mm to 3.2mm and increased metal temperature by 15°C. Scrap dropped to 3%.
How Do You Finish Aluminum Shells for Production?
Post-treatment turns raw castings into finished products.
Basic Processing
Support removal: Use plastic tweezers (not metal) to avoid scratching. For small features (0.5mm snap grooves), use a 0.3mm rotary tool with rubber tip.
Surface polishing (three steps):
- 400# sandpaper: Remove ejector marks and burrs
- 800# sandpaper: Smooth scratches
- 1200# sandpaper: Prepare for coating (achieve Ra ≤ 0.8μm)
Cleaning: Ultrasonic cleaning at 30kHz for 5 minutes. For release agent residue, wipe with 70% isopropyl alcohol.
Advanced Surface Enhancement
Anodizing: For corrosion resistance, use hard anodizing (15–25μm thickness). Meets MIL-A-8625 Type III with 2,000+ hours salt spray resistance.
Painting/coating:
- Consumer electronics: 2–3μm PTFE coating for matte finish and anti-fingerprint
- EMI shielding: 5–8μm electroless nickel plating (conductivity under 10Ω/sq)
Laser engraving: Fiber laser at 20W power, 500mm/s speed for permanent branding.
Quality Inspection
Dimensional check: CMM (Coordinate Measuring Machine) verification to ±0.1mm tolerance.
Surface inspection: 10× magnification—no defects over 0.1mm.
Functional testing:
- Waterproof shells: IP67 (1m water, 30 minutes, no leakage)
- Impact-resistant shells: 1.5m drop onto concrete—no cracks or deformation
What Are the Economics of Aluminum Shell Die Casting?
Cost Breakdown for a Typical Shell
For a 50g phone frame (1mm wall thickness, 100,000 units/year):
| Cost Component | Percentage | Notes |
|---|---|---|
| Material (ADC12) | 25–30% | $2.50–3.00 per kg |
| Mold amortization | 15–20% | $50,000 mold spread over volume |
| Production | 30–35% | Machine time, labor, energy |
| Post-treatment | 15–20% | Trimming, polishing, coating |
| Quality control | 5–10% | Inspection, testing |
| Total per part | $3.50–5.00 | Varies with complexity and finish |
Small-Batch Economics (Under 10,000 Units)
For low volumes, die casting becomes expensive because mold costs dominate. Options:
- Semi-permanent aluminum molds: Cost 50–70% less than steel H13 molds, but last only 5,000–10,000 shots
- Runner recycling: Separate runner condensate from scrap, blend with 20% new aluminum—saves 15% on material
How to write a spec that gets priced correctly
A drawing is a contract. If it leaves a number open, the shop fills that number in with its own default. The default is rarely the one you had in mind. Put these five lines on every RFQ and most of the back-and-forth disappears before it starts.
- 3D model with the parting line marked
- Alloy grade and the standard it meets
- Wall thickness and draft on every face
- Machining allowance on the faces that will be cut
- Pressure tightness or porosity class
The point is not paperwork. Each line removes a decision the shop would otherwise make for you. A complete RFQ comes back priced. An incomplete one comes back guessed.
What actually drives the price
Buyers usually push on material because it is the line they can see. In practice the material is rarely the biggest number on a quote. These five lines decide most of it:
- die steel and cavity count
- part weight and wall section
- draft and slide count
- porosity requirement
- machining allowance
Ask for the quote split by line. A supplier who cannot break it down is guessing, and you will pay for the guess. The line you can usually renegotiate is the tolerance band, not the raw material.
Problems you will meet, and the fix
Every process has a failure mode it prefers. The same four show up again and again on this kind of work, and none of them are mysteries once you know what to look for.
- Cold shuts where two flow fronts meet
- Porosity that shows up only after machining
- Soldering on a hot spot in the die
- Shrinkage voids in a heavy section
Catch the fault on the first part, not the hundredth. A first-article check costs an hour. A bad batch costs the whole order. Write the check into the purchase order so nobody has to remember it.
What to check on the first article
The first article is the cheapest inspection you will ever buy. Use it properly and the rest of the run becomes boring, which is exactly what you want.
- Every dimension on the drawing, with the measured value written beside it.
- The material certificate, matched to the heat or lot number on the parts.
- The finish against the sample you approved, under the same light.
- Fit against the mating part, assembled rather than measured.
- Packaging, because parts that arrive damaged were never in tolerance.
Check in this order: datums, then mating features, then cosmetic faces. If the datums are wrong, every number after them is noise. Keep the report on file. When a problem shows up in month six, that document is the only thing that tells you what changed.
How to compare two quotes fairly
Two numbers are not comparable unless the scope matches. Line them up before you decide, because a low number with three gaps is not a low number.
Same drawing, same material, same finish, same inspection. Anything else is a different job wearing the same part number. Then look at what each quote leaves out. Freight, packaging, certificates and tooling are the usual gaps.
Ask each supplier to state their assumptions in writing. The one who does is usually the one who has run the process before.
Scaling from one part to a batch
The first part teaches you the process. The hundredth teaches you the process cost.
Watch three things as volume grows: setup amortisation, tool wear, and how much hand work the finish still needs. If the unit price barely moves between ten and a hundred, the cost sits in material or in hand work, not in setup. Ask which, because only one of them is negotiable.
Lead time behaves the same way. A one-off is scheduled around other jobs. A repeat order is scheduled around your forecast. Give the shop a forecast and the lead time gets shorter, not longer.
How to read a supplier's quote
A quote is a short document with a long shadow. Four things in it decide whether the job runs smoothly, and only one of them is the price.
- The scope line. It should name the process, the material and the finish, not just the part.
- The tolerance basis. General tolerance or the drawing, and which standard it follows.
- The exclusions. Tooling, freight, certificates and inspection are the usual omissions.
- The validity date. Material prices move, and an open-ended quote is a promise nobody can keep.
Read the exclusions before you read the total. A quote that leaves out tooling is not cheaper. It is a quote for a different job.
FAQ About Aluminum Shell Die Casting
Can I prototype aluminum shells with 3D printing before committing to die casting?
Yes—FDM printing with ABS or PETG works for early fit and ergonomics checks. But FDM cannot replicate aluminum’s strength or heat properties. For functional testing, use vacuum casting with aluminum-filled resin—it mimics die-cast aluminum’s density and stiffness much better.
What is the thinnest wall possible for aluminum shells?
Practical minimum is 0.6mm for small shells (under 50mm size). To achieve this:
- Use high-fluidity alloy (ADC12)
- Heat mold to 230–240°C
- Use fan-shaped gate (width 5× wall thickness)
- Inject at 4–4.5 m/s
- Add relief groove at last-filling area
How do I prevent warpage in large thin shells?
Three proven methods:
- Balance cooling: Move water channels to 5mm from cavity; use copper inserts under thick features
- Design symmetry: If one side has ribs, add balancing ribs to the other side
- Control ejection: Use 12+ pins with even force distribution; verify with force gauge
Can anodizing hide surface defects?
No—anodizing actually reveals defects. The anodizing layer is transparent and amplifies visibility of surface imperfections. Fix defects before anodizing, or use painting instead.
What causes porosity in thin walls, and how do I fix it?
Porosity in thin walls usually comes from:
- Turbulent flow → fix with smoother runner transitions and slower injection
- Dissolved gas → fix with longer degassing (argon, 18–20 minutes)
- Moisture → dry materials at 120–150°C for 6 hours
Aluminum shell die casting is a precise, demanding process. Success requires attention at every step:
- Material selection: Match alloy to shell function—ADC12 for thin consumer parts, A380 for corrosion resistance, A356 for heat dissipation, AlSi10MgMn for weldability
- Mold design: Keep walls uniform, use ribs for strength, design runners for smooth flow, place cooling channels strategically
- Process control: Pre-heat molds to 200–230°C, use two-stage injection (1–2 then 3–4 m/s), apply 80–120MPa pressure, hold for 5–8 seconds
- Defect prevention: Fix cold shuts with speed and temperature adjustments, eliminate pinholes through degassing, prevent warpage with balanced cooling and ejection
- Post-treatment: Polish in three stages, anodize or coat as needed, inspect thoroughly
The most successful manufacturers treat the shell as a system—not just a part. They use simulation to predict problems before cutting steel. They control every parameter during production. They inspect thoroughly after casting. The result: yield rates over 98% and shells that meet the strictest industry standards.
How we can help
YiguProto runs die casting in house, from a single prototype to a production batch. We quote the process, the material and the finish as separate lines, so you can see where the money goes instead of arguing with one number.
Send a STEP file or a drawing and you get a DFM report in one to two business days. It flags the features that add cost and the features that will not hold tolerance on the process you picked.
Every order ships with an inspection report on the features you call out. If a part misses, we make it again. Ready to price a part? Start with a free quote and DFM review, or read more about our die casting. You can also talk to an engineer before you commit to a drawing.
Frequently asked questions
What material should I specify?
Specify by standard, not by trade name. A trade name can change under you between two orders; a standard number cannot. Then add the one property that actually decides the part, whether that is strength, heat resistance or chemical exposure.
What happens if a part is out of specification?
We measure it against the same drawing you approved and, if it misses, we make it again. What matters is that the report exists, because a disagreement without data is just an opinion.
How long does a first article take?
Usually a few business days once the drawing is frozen, and longer if tooling is involved. The date we give you is the date we confirm in writing, not the date we hope for.
Does the process work for prototypes as well as production?
Yes, and that is usually the point. Running the prototype on the production process removes a whole class of surprises, because the part you test is made the same way as the part you sell.
What files do you need in order to quote?
A STEP file plus a PDF drawing that carries the same revision letter. The model carries the geometry and the drawing carries the intent. When the two disagree, the shop picks one, and it is never the one you meant.
How do I compare two quotes fairly?
Match the scope first: same drawing, same material, same finish, same inspection. Then read the exclusions. Freight, tooling and certificates are the usual gaps, and a low number with three gaps is not a low number.
The short version
Good parts reward the buyer who reads the data sheet and the drawing together. Pick the option for the property that matters, not for the price per kilo.
Tighten only what mates. Test a sample before the run. Then let the process do the rest.