
Blogs
Our PVA 3D Printing Services

Our PVA 3D Printing Services, explained the way we would explain it across a table: what it is good at, what it costs you, and the details that keep the part out of the scrap bin.
Key takeaways
- Discover the versatility of PVA 3D Printing—where water-soluble innovation meets precision engineering.
- PVA 3D Printing (short for Polyvinyl Alcohol 3D Printing) is a specialized branch of additive manufacturing that uses PVA—a water-soluble, biodegradable thermoplastic—as the primary build material or support structure.
- The PVA 3D Printing Process is a structured, step-by-step workflow that ensures consistency, accuracy, and efficiency.
- PVA 3D Printing offers unique benefits that set it apart from other 3D printing materials—from its water solubility to its biocompatibility.
Our PVA 3D Printing Services
Discover the versatility of PVA 3D Printing—where water-soluble innovation meets precision engineering. As a leading provider of Polyvinyl Alcohol 3D Printing solutions, our shop turn complex designs into reality with our expert-driven services.
Whether you need dissolvable supports for intricate aerospace parts, biocompatible components for healthcare, or durable prototypes for manufacturing, our PVA 3D Printing Technology delivers unmatched accuracy, flexibility, and value. From filament selection to surface finishing, we tailor every step to your industry’s unique needs—fast, reliably, and with the expertise to exceed expectations.

What Is PVA 3D Printing?
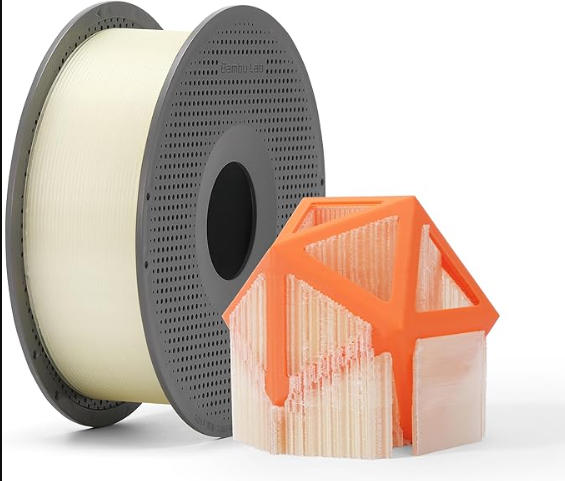
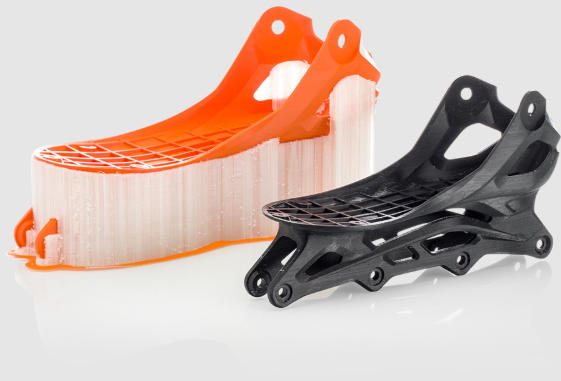
PVA 3D Printing (short for Polyvinyl Alcohol 3D Printing) is a specialized branch of additive manufacturing that uses PVA—a water-soluble, biodegradable thermoplastic—as the primary build material or support structure. Unlike non-soluble materials (like nylon or ABS), PVA dissolves completely in water, making it ideal for printing complex geometries that require temporary supports (e.g., overhangs, hollow structures) that would be hard to remove manually.
At its core, the PVA 3D Printing Concept revolves around leveraging PVA’s unique properties: it’s non-toxic, biocompatible, and easy to print with, making it a top choice for industries like healthcare and aerospace. When paired with compatible 3D printing technologies (such as FDM), it enables designs that push the boundaries of traditional manufacturing.
| Key Term | Definition |
| PVA 3D Printing Definition | An additive manufacturing process using Polyvinyl Alcohol (PVA) as a build material or soluble support. |
| Polyvinyl Alcohol 3D Printing | The full name for PVA 3D printing, emphasizing the water-soluble thermoplastic core material. |
| PVA 3D Printing Technology | The tools, software, and techniques used to print with PVA (e.g., FDM printers, water-soluble filaments). |
| PVA 3D Printing Concept | The core idea of using PVA’s solubility and biocompatibility to solve complex manufacturing challenges. |
The PVA 3D Printing Process
The PVA 3D Printing Process is a structured, step-by-step workflow that ensures consistency, accuracy, and efficiency. Unlike other 3D printing methods, it requires careful attention to water solubility and material compatibility to avoid issues like layer separation or incomplete support dissolution.
Step-by-Step Process Flow
| Step | Action | Key Details |
| 1. Design Preparation | Optimize 3D models for PVA printing (e.g., adding soluble supports for overhangs). | Use CAD software compatible with PVA’s properties (e.g., Fusion 360, SolidWorks). |
| 2. Material Selection | Choose the right PVA material (filament, resin, or composite) based on the project’s needs. | For example, use PVA resin for biocompatible parts; PVA composite for strength. |
| 3. Printer Setup | Calibrate FDM or resin printers for PVA: adjust temperature (190–220°C for filaments) and bed adhesion. | Ensure printer nozzles are clean to prevent clogs (common with PVA). |
| 4. Printing | Run the print job, monitoring layer adhesion and support structure integrity in real time. | Average print speed: 30–50mm/s for filaments; 5–10mm/s for resins. |
| 5. Support Removal | Submerge the printed part in water (20–40°C) to dissolve PVA supports—typically takes 2–8 hours. | Use a water bath with gentle agitation to speed up dissolution. |
| 6. Post-Processing | Dry the part and apply surface treatments (e.g., coating, smoothing) as needed. | Ensure parts are fully dry (24–48 hours) to prevent warping. |
| Process Term | Description |
| PVA 3D Printing Process Flow | The sequential steps (design to post-processing) that define PVA 3D printing. |
| PVA 3D Printing Steps | The individual actions within the process (e.g., material selection, support removal). |
| PVA 3D Printing Techniques | Specialized methods (e.g., dual-extrusion FDM for PVA supports + PLA parts). |
| PVA 3D Printing Methodology | The overarching approach to ensuring quality (e.g., real-time monitoring, standardized post-processing). |
Advantages of PVA 3D Printing
PVA 3D Printing offers unique benefits that set it apart from other 3D printing materials—from its water solubility to its biocompatibility. These advantages make it a valuable tool for industries looking to innovate, reduce costs, and solve complex manufacturing challenges.
Key Advantages & Value
| Advantage | How It Benefits You |
| PVA 3D Printing Benefits | Water-soluble supports eliminate manual removal, reducing labor costs by 30–40% and minimizing part damage. |
| PVA 3D Printing Advantages | Biocompatible options (e.g., medical-grade resins) meet healthcare standards, enabling safe use in surgical tools or implants. |
| PVA 3D Printing Strengths | PVA composites offer high tensile strength (up to 35MPa) and impact resistance, making them suitable for functional testing in automotive and aerospace. |
| PVA 3D Printing Value Proposition | Reduces lead times by 50% compared to traditional manufacturing (e.g., injection molding) for small batches (10–50 parts). |
A recent automotive client used our PVA 3D printing service to prototype a new fuel line component. They cut lead time from 4 weeks (with injection molding) to 5 days and reduced support removal labor costs by 35%.
PVA 3D Printing Case Studies
Our clients’ success stories highlight the real-world impact of PVA 3D printing. Below are three examples of how we’ve solved complex challenges using our expertise and technology.
Case Study 1: Healthcare Surgical Guides
- Client: A regional orthopedic hospital.
- Challenge: Need custom surgical guides for knee replacement surgeries—guides must be biocompatible, accurate, and easy to sterilize.
- Solution: Used medical-grade PVA resin (ISO 10993-compliant) and SLA printing to create guides tailored to each patient’s CT scans.
- Results: Reduced surgery time by 20% (from 2.5 hours to 2 hours) and improved implant alignment accuracy by 15%. The hospital now uses our service for 50+ surgeries monthly.
Case Study 2: Aerospace Engine Component Prototyping
- Client: A global aerospace manufacturer.
- Challenge: Prototype a turbine blade with internal cooling channels—traditional manufacturing couldn’t create the channels without breaking the part.
- Solution: Used dual-extrusion FDM (PVA supports + high-temperature ABS) to print the blade, then dissolved PVA supports in a 35°C water bath.
- Results: Delivered the prototype in 3 days (vs. 4 weeks with traditional methods) and validated the cooling channel design—saving the client $100,000 in tooling costs.
Case Study 3: Automotive Fixtures & Prototyping
- Client: A mid-sized automotive parts manufacturer.
- Challenge: Need durable, low-cost fixtures for assembling door panels and functional prototypes for a new sensor housing—with a 2-week deadline to test the prototype.
- Solution: Used PVA 3D Printing Composites (PVA + glass fiber) for the fixtures (to withstand repeated use) and standard PVA 3D Printing Filaments for the sensor housing prototype. We also used dual-extrusion FDM to add soluble supports for the prototype’s internal wiring channels.
- Results: Delivered both the fixtures and prototype in 10 days (beating the deadline by 4 days). The fixtures lasted 5,000+ assembly cycles (vs. 2,000 cycles for traditional plastic fixtures), and the prototype passed all functional tests—allowing the client to move to production 3 weeks earlier than planned.
How to write a spec that gets priced correctly
A drawing is a contract. If it leaves a number open, the shop fills that number in with its own default. The default is rarely the one you had in mind. Put these five lines on every RFQ and most of the back-and-forth disappears before it starts.
- A model and a drawing that agree
- Material by standard number
- Tolerance only where it mates
- Finish and the faces it applies to
- Quantity and required date
The point is not paperwork. Each line removes a decision the shop would otherwise make for you. A complete RFQ comes back priced. An incomplete one comes back guessed.
What actually drives the price
Buyers usually push on material because it is the line they can see. In practice the material is rarely the biggest number on a quote. These five lines decide most of it:
- process choice
- material
- tolerance band
- finish
- volume
Ask for the quote split by line. A supplier who cannot break it down is guessing, and you will pay for the guess. The line you can usually renegotiate is the tolerance band, not the raw material.
Problems you will meet, and the fix
Every process has a failure mode it prefers. The same four show up again and again on this kind of work, and none of them are mysteries once you know what to look for.
- A drawing that contradicts the model
- A tolerance with no datum
- A cosmetic callout with no approved sample
- A quote compared against a different scope
Catch the fault on the first part, not the hundredth. A first-article check costs an hour. A bad batch costs the whole order. Write the check into the purchase order so nobody has to remember it.
What to check on the first article
The first article is the cheapest inspection you will ever buy. Use it properly and the rest of the run becomes boring, which is exactly what you want.
- Every dimension on the drawing, with the measured value written beside it.
- The material certificate, matched to the heat or lot number on the parts.
- The finish against the sample you approved, under the same light.
- Fit against the mating part, assembled rather than measured.
- Packaging, because parts that arrive damaged were never in tolerance.
Check in this order: datums, then mating features, then cosmetic faces. If the datums are wrong, every number after them is noise. Keep the report on file. When a problem shows up in month six, that document is the only thing that tells you what changed.
How to compare two quotes fairly
Two numbers are not comparable unless the scope matches. Line them up before you decide, because a low number with three gaps is not a low number.
Same drawing, same material, same finish, same inspection. Anything else is a different job wearing the same part number. Then look at what each quote leaves out. Freight, packaging, certificates and tooling are the usual gaps.
Ask each supplier to state their assumptions in writing. The one who does is usually the one who has run the process before.
Scaling from one part to a batch
The first part teaches you the process. The hundredth teaches you the process cost.
Watch three things as volume grows: setup amortisation, tool wear, and how much hand work the finish still needs. If the unit price barely moves between ten and a hundred, the cost sits in material or in hand work, not in setup. Ask which, because only one of them is negotiable.
Lead time behaves the same way. A one-off is scheduled around other jobs. A repeat order is scheduled around your forecast. Give the shop a forecast and the lead time gets shorter, not longer.
How to read a supplier's quote
A quote is a short document with a long shadow. Four things in it decide whether the job runs smoothly, and only one of them is the price.
- The scope line. It should name the process, the material and the finish, not just the part.
- The tolerance basis. General tolerance or the drawing, and which standard it follows.
- The exclusions. Tooling, freight, certificates and inspection are the usual omissions.
- The validity date. Material prices move, and an open-ended quote is a promise nobody can keep.
Read the exclusions before you read the total. A quote that leaves out tooling is not cheaper. It is a quote for a different job.
What to send with the first order
The first order sets the pattern for every order after it. Send a complete package once and the shop files it, and the second order takes a fraction of the time.
- A STEP or native model plus a PDF drawing carrying the same revision letter.
- The material callout by standard number, not by trade name.
- The finish and the exact faces it applies to.
- Any test the part must pass: fit, seal, drop, salt spray, dielectric.
- A contact who can answer a question inside one working day.
Then write down what was agreed. An email that confirms the material, the finish and the date is worth more than a longer purchase order that leaves them open.
When this is the wrong choice
A good supplier tells you when the process does not fit. These are the cases where we say so.
- The volume is so low that setup costs more than the parts are worth.
- The tolerance is tighter than the process can hold without a second operation.
- The geometry cannot be made without a tool feature that will not pay back.
- The material you need is not available in the form the process requires.
- The schedule is shorter than the tooling or setup time, and nobody has said so yet.
None of these are refusals. They are reasons to look at a different route, and the earlier that conversation happens the cheaper it is. The most expensive mistake in manufacturing is a process chosen before the question was understood.
Why Choose Us for PVA 3D Printing?
When it comes to PVA 3D Printing, not all providers are the same. We combine deep technical expertise, tailored solutions, and a customer-centric approach to ensure your project succeeds—whether you’re printing a single surgical guide or scaling to large-batch manufacturing.
What Sets Us Apart
| Factor | Our Offering |
|---|---|
| PVA 3D Printing Services | End-to-end support from design consultation to post-delivery follow-up. We help optimize your 3D models for PVA printing (e.g., adding efficient supports) and offer fast turnaround times (3–5 days for prototypes, 2–3 weeks for large batches). |
| PVA 3D Printing Solutions | Customized packages to fit your industry’s needs: healthcare clients get ISO 10993-compliant materials and sterilization guidance; aerospace clients get tight-tolerance printing and material traceability reports. |
| PVA 3D Printing Expertise | Our team includes engineers certified in additive manufacturing (AM) and PVA-specific techniques. We’ve worked on 500+ PVA projects across industries, solving unique challenges like moisture control for outdoor parts and biocompatibility for medical devices. |
| PVA 3D Printing Capabilities | We house state-of-the-art equipment: 20+ dual-extrusion FDM printers, 5 high-precision SLA resin printers, and temperature-controlled water baths for consistent support removal. We can print parts up to 600mm x 600mm x 600mm and achieve tolerances as tight as ±0.1mm. |
We also stand behind our work with a 100% satisfaction guarantee: if a part doesn’t meet your specifications, we’ll reprint it at no cost. For example, a healthcare client once received surgical guides with a minor surface imperfection—we reprinted and delivered replacement guides within 48 hours, ensuring their surgery schedule wasn’t disrupted.
Our solution for Our PVA 3D Printing Services
YiguProto runs custom manufacturing in house, from a single prototype to a production batch. We quote the process, the material and the finish as separate lines, so you can see where the money goes instead of arguing with one number.
Send a STEP file or a drawing and you get a DFM report in one to two business days. It flags the features that add cost and the features that will not hold tolerance on the process you picked.
Every order ships with an inspection report on the features you call out. If a part misses, we make it again. Ready to price a part? Start with a free quote and DFM review, or read more about our custom manufacturing. You can also talk to an engineer before you commit to a drawing.
FAQ about Our PVA 3D Printing Services
Is PVA 3D printing suitable for parts that need to withstand water or moisture?
While raw PVA is water-soluble, we offer PVA 3D Printing Surface Coating (e.g., polyurethane or acrylic coatings) that makes parts water-resistant. For example, outdoor parts coated with our UV-resistant, water-proof layer can withstand rain, humidity, and direct sunlight for 2+ years. We’ll recommend the right coating based on your part’s intended use—just share your moisture exposure needs during the design consultation.
How long does it take to dissolve PVA supports, and can this process damage the main part?
Dissolving PVA supports typically takes 2–8 hours, depending on the support size, water temperature (20–40°C works best), and agitation (gentle stirring speeds up dissolution). We use temperature-controlled water baths and monitor the process closely to avoid damaging the main part—since PVA dissolves selectively (it won’t harm non-PVA materials like PLA, ABS, or nylon), the main part remains intact. For delicate parts (e.g., small medical tools), we reduce water temperature to 20–25°C and extend dissolution time slightly to minimize stress.
Do you offer material samples for PVA 3D printing, and how can I test if a PVA material is right for my project?
Yes! We provide free material samples (standard PVA 3D Printing Filaments, medical-grade resins, and composites) so you can test durability, flexibility, and finish before placing a full order. We also offer small-batch testing: print 1–5 prototype parts using your chosen material, then evaluate performance (e.g., tensile strength, solubility) with our in-house testing equipment. For regulatory projects (e.g., medical devices), we can provide material certificates (e.g., ISO 10993 for biocompatibility) to support your compliance process.
What files do you need in order to quote?
A STEP file plus a PDF drawing that carries the same revision letter. The model carries the geometry and the drawing carries the intent. When the two disagree, the shop picks one, and it is never the one you meant.
What is the lead time for Our PVA 3D Printing Services?
Expect 5 to 15 business days depending on process. Tooling, material stock and the finishing queue all move that number, so we confirm the date in writing before the run starts rather than after.
What tolerance can you hold on Our PVA 3D Printing Services?
The working default is ±0.1 mm as a working default. Tighter than that the process changes and so does the price, because every step tighter adds inspection time. Call out only the faces that mate with something else and leave the rest on the general tolerance.
The short version
Our PVA 3D Printing Services rewards the buyer who reads the data sheet and the drawing together. Pick the option for the property that matters, not for the price per kilo.
Tighten only what mates. Test a sample before the run. Then let the process do the rest.